Ask Your Question
6

How to work with OPENCV4ANDROID- in android studio

asked 2013-06-03 04:26:53 -0600

ezfn gravatar image

Hi, Can anyone give a tutorial or first steps of how to import opencv for android to the new android studio [or intellij] environment?

Thanks, Erez

edit retag flag offensive close merge delete

4 answers

Sort by ยป oldest newest most voted
9

answered 2013-06-28 10:11:57 -0600

AnthonyKeane gravatar image

updated 2013-06-28 10:22:28 -0600

  • Download OpenCV-2.4.5-android-sdk.zip from OpenCV site
  • Extract to where ever as OpenCV-2.4.5-android-sdk, mine happened to be

    /home/anthony/Documents/OpenCV-2.4.5-android-sdk/

  • Open Android Studio and choose Import

  • Select the folder to import

    /home/anthony/Documents/OpenCV-2.4.5-android-sdk/sdk/java/

     yours will be a little different, 
     don't worry, just chose where you 
     extracted OpenCV-2.4.5-android-sdk
    
  • Once the Import wizard finishes, build the app with menu

Build -> Rebuild Project

  • Close Project

  • Create New or Open existing project
  • Then

File->Import Module

  • This time select

/home/anthony/Documents/OpenCV-2.4.5-android-sdk/sdk/java/XXX.iml

mine was sdk.iml, but yours could be anything but there will be only one

iml file

![] (/upfiles/13724316303530617.png)(http://)

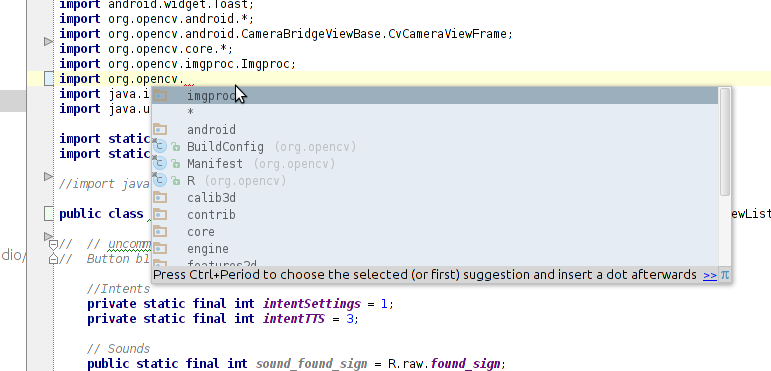
You can now start using OpenCV functions, start by typing

import org.

once you type the period Android Studio should drop a list of options one of which is

opencv

image description

The rest is up to you.

edit flag offensive delete link more

Comments

1

The point "Open Android Studio and choose Import" isn't clear to me. Where exactly to find import? Maybe File -> ... and then Import Project or Import Module?

daniel.s gravatar imagedaniel.s ( 2015-06-13 05:19:37 -0600 )edit
1

I think you left out the step where you go File>Project Structure and then add the dependency for opencv.

Other than that, it works.

ConorB gravatar imageConorB ( 2015-10-31 17:04:19 -0600 )edit

Hi,

I am not able to execute the following point : This time select /home/anthony/Documents/OpenCV-2.4.5-android-sdk/sdk/java/XXX.iml

when i am selecting the iml file path it says "Specify location of the Gradle or Android eclipse project" Please help.

ADiv gravatar imageADiv ( 2016-03-06 03:39:28 -0600 )edit

i had a little confusion with this part myself. Here's what i did to get around it. create a new project (i named mine app), file->project settings click on your module in the left pane and select the Dependencies tab. add a dependency (point it to the folder containing the .iml file).

precip gravatar imageprecip ( 2016-04-18 16:38:03 -0600 )edit

Thanks @connorB . It works for me doing what you say. In the import module step, I do import a .xml file because i can't find any .iml file.. I think it is some kind of OP's misspelling.

fedeo gravatar imagefedeo ( 2016-06-16 20:10:33 -0600 )edit
0

answered 2017-12-18 12:34:31 -0600

procton gravatar image

You may try the following tutorial http://blog.codeonion.com/2015/11/25/...

edit flag offensive delete link more
2

answered 2015-06-30 11:46:43 -0600

Jwalant gravatar image

Simple Steps:-(Indirect Method)

  1. Download/Install(Extract) OpenCV for Android (you might already have it)
    Download :-here Documentation :- here
    Version 2.4.11 is recommended.
  2. Open you Android Project on Android Studio. Import Module (Files >> New >> Import Module) Browse the path to the samples Folder inside OpenCV for Android Folder and Select any one of the Samples
    eg :-OpenCV-2.4.11-android-sdk\OpenCV-android-sdk\samples\15-puzzle
    While importing keep everything checked.
    This will automatically add OpenCV Libraries Module to your project.
    Now you can delete the 15-puzzle module (this is optional).
  3. In the gradle file of your app add dependency :- compile project(':openCVLibrary2411')
    dependencies { compile project(':openCVLibrary2411') }
  4. Now you can Import openCV classes in your project
    eg:-

import org.opencv.android.BaseLoaderCallback;
import org.opencv.android.LoaderCallbackInterface;
import org.opencv.android.OpenCVLoader;

edit flag offensive delete link more

Comments

In build.gradle:

// NOTE: Do not place your application dependencies here; they belong // in the individual module build.grade files

The prohibition is clear; the instruction is not.

Plus, dependencies { compile project(':openCVLibrary2411') } does not work, anyway; Android Studio requires that you declare 'dependencies' a local variable, which I believe has nothing to do with declaring a dependency.

Would classpath ':openCVLibrary2411' work? What if you're using OpenCV for Android SDK 3.0?

theoknock gravatar imagetheoknock ( 2015-10-18 22:09:03 -0600 )edit

You are the best

blessochampion gravatar imageblessochampion ( 2015-12-03 04:37:45 -0600 )edit

@theoknock. You should add the dependenies in build.gradle module. Not the project.

Tonystark124 gravatar imageTonystark124 ( 2016-03-01 04:34:19 -0600 )edit
9

answered 2013-08-07 19:52:37 -0600

garyp gravatar image

updated 2013-08-07 19:55:09 -0600

Android Studio uses gradle as the build system for Android projects. Until the OpenCV Android SDK ships with support for gradle out-of-the-box, I find it easiest to first convert the SDK to a gradle project from Eclipse before using it from Android Studio. To do this:

  1. If you don't have it installed already, install the Eclipse Android Developer Tools bundle from http://developer.android.com/sdk/index.html.

  2. Make sure you have the latest version of the Eclipse ADT plugin installed.

  3. Download and extract the OpenCV Android SDK (e.g. OpenCV-2.4.6-android-sdk-r2.zip)

  4. Open Eclipse and import the OpenCV Android SDK using the instructions on the OpenCV website. Note: When selecting the root directory to import, use the OpenCV-2.4.6-android-sdk/sdk/java sub-directory and not the top-level OpenCV-2.4.6-android-sdk directory as the instructions on that site suggest.

  5. Select File > Export. In the window that appears, open Android and select Generate Gradle build files.

Your copy of the OpenCV Android SDK should now be properly configured to be built by gradle. To use it from a new project in Android Studio:

  1. Create the Android app project using the New Project wizard in Android Studio. Make sure you set the minimum Android SDK to at least version 8 (this is what the OpenCV Android SDK declares as its minimum). For the following instructions, I'll assume the project is using the default name of "MyApplicationProject".

  2. Copy/move your copy of the OpenCV Android SDK into the new project directory (e.g. copy the OpenCV-2.4.6-android-sdk/sdk/java directory to MyApplicationProject/opencv-android).

  3. Open MyApplicationProject/settings.gradle and add ':opencv-android' to the include line. The new line should look similar to this:

    include ':MyApplication', ':opencv-android'
    
  4. Open MyApplicationProject/MyApplication/build.gradle and add "compile project(':opencv-android')" to the dependencies section. Make sure this is the top-level dependencies section and not the one inside of the buildscript section at the top of the file. The new dependencies section should look similar to this:

    dependencies {
        compile 'com.android.support:support-v4:13.0.+'
        compile project(':opencv-android')
    }
    
  5. In Android Studio, select Tools > Android > Sync Project with Gradle Files.

Your new project can now use the OpenCV Android SDK from Android Studio. For example, you should be able to implement the "Hello World" example from the OpenCV Android tutorial (skip all of the Eclipse setup instructions and just make the layout, Android manifest, and main activity changes inside MyApplication).

edit flag offensive delete link more

Comments

okay man, when you say import..there are three imports....which one to use...to import?

JonCS gravatar imageJonCS ( 2015-03-21 21:01:20 -0600 )edit

Question Tools

2 followers

Stats

Asked: 2013-06-03 04:26:53 -0600

Seen: 50,873 times

Last updated: Dec 18 '17