This forum is disabled, please visit https://forum.opencv.org
| | 1 | initial version |
Thanks to Tetragramm, I was able to parse the png files correctly and apply the LUT to the images.
This is how I read the png files:
Mat prepareLUT(char* filename){
    Mat first;
    first = imread(filename, CV_LOAD_IMAGE_COLOR);
    Mat floatmat;
    first.convertTo(floatmat, CV_32F);
    std::vector<Mat> channels(3);
    split(floatmat, channels);
    Mat res(Size(960,1080), CV_32FC1);
    res = channels[2]/255 + channels[1]/(255.0*255.0) + channels[0]/(255.0*255.0*255.0);
    return res;
}
This leaves me with Mats with values between 0 and 1.00393694733. The remap function expects values between 0 and width for the x-LUT and between 0 and height for the y-LUT. Therefore the LUTs for x have to be multiplied by the width and the LUTs for y have to be multiplied by the height, like this:
    sprintf(lutFile, "%s%s", getenv("EXTERNAL_STORAGE"), "/HeadsetAssets/LUT_XB.png");
    data->lut_xb.create(Size(960, 1080), CV_32FC1);
    data->lut_xb = prepareLUT(lutFile)*960;
    sprintf(lutFile, "%s%s", getenv("EXTERNAL_STORAGE"), "/HeadsetAssets/LUT_XG.png");
    data->lut_xg.create(Size(960, 1080), CV_32FC1);
    data->lut_xg = prepareLUT(lutFile)*960;
    sprintf(lutFile, "%s%s", getenv("EXTERNAL_STORAGE"), "/HeadsetAssets/LUT_XR.png");
    data->lut_xr.create(Size(960, 1080), CV_32FC1);
    data->lut_xr = prepareLUT(lutFile)*960;
    sprintf(lutFile, "%s%s", getenv("EXTERNAL_STORAGE"), "/HeadsetAssets/LUT_YB.png");
    data->lut_yb.create(Size(960, 1080), CV_32FC1);
    data->lut_yb = prepareLUT(lutFile)*1080;
    sprintf(lutFile, "%s%s", getenv("EXTERNAL_STORAGE"), "/HeadsetAssets/LUT_YG.png");
    data->lut_yg.create(Size(960, 1080), CV_32FC1);
    data->lut_yg = prepareLUT(lutFile)*1080;
    sprintf(lutFile, "%s%s", getenv("EXTERNAL_STORAGE"), "/HeadsetAssets/LUT_YR.png");
    data->lut_yr.create(Size(960, 1080), CV_32FC1);
    data->lut_yr = prepareLUT(lutFile)*1080;
This gives me a data struct with 6 LUT-Mats (implementation of the data structure is trivial).
I then apply the remap function to every channel of my input:
    std::vector<Mat> channels(3);
    split(inframe, channels);

    std::vector<Mat> remapped;

    Mat m1;
    remap(channels[0], m1, data->lut_xr, data->lut_yr, INTER_LINEAR);
    Mat m2;
    remap(channels[1], m2, data->lut_xg, data->lut_yg, INTER_LINEAR);
    Mat m3;
    remap(channels[2], m3, data->lut_xb, data->lut_yb, INTER_LINEAR);
    remapped.push_back(m1);
    remapped.push_back(m2);
    remapped.push_back(m3);

    Mat merged;
    merge(remapped, merged);
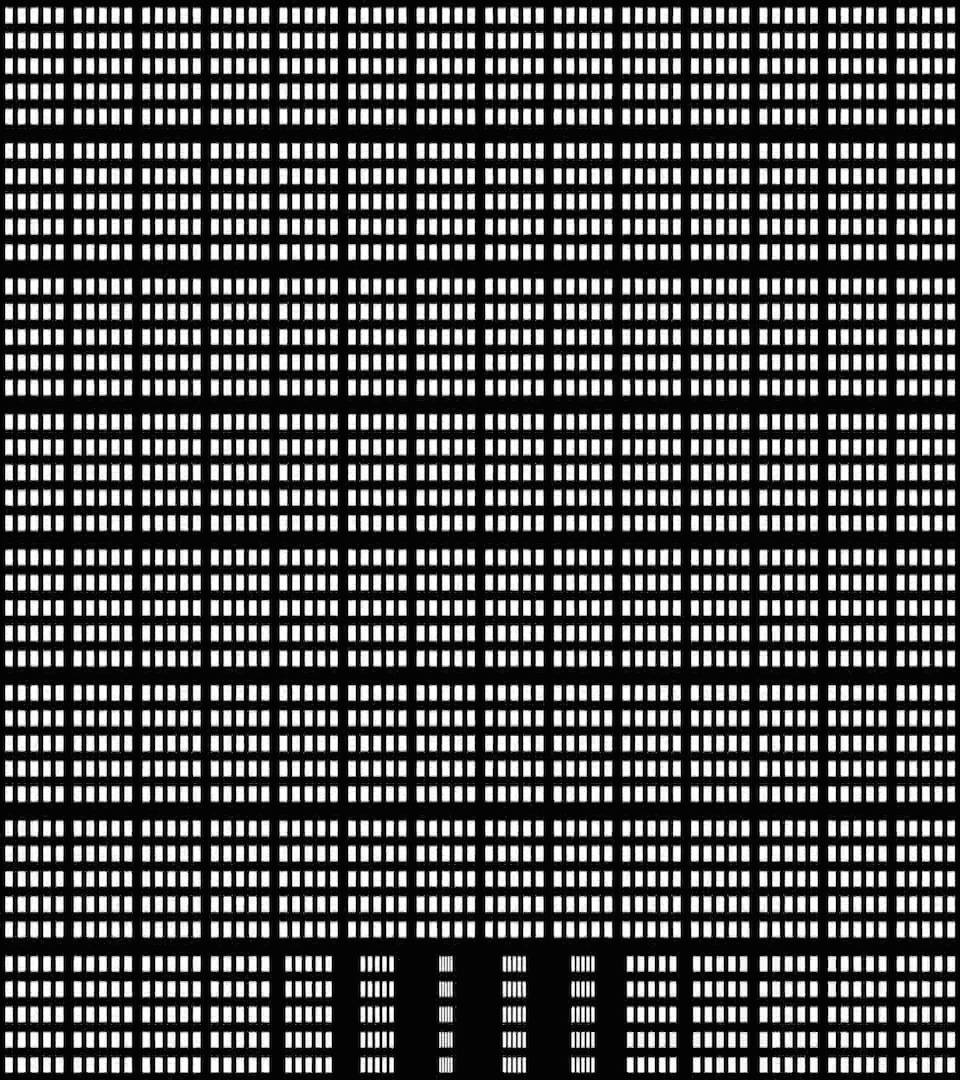
The Mat in merged is then the original image with the barrel distortion applied. As a sample I used a grid like this:
And the output looked like this:
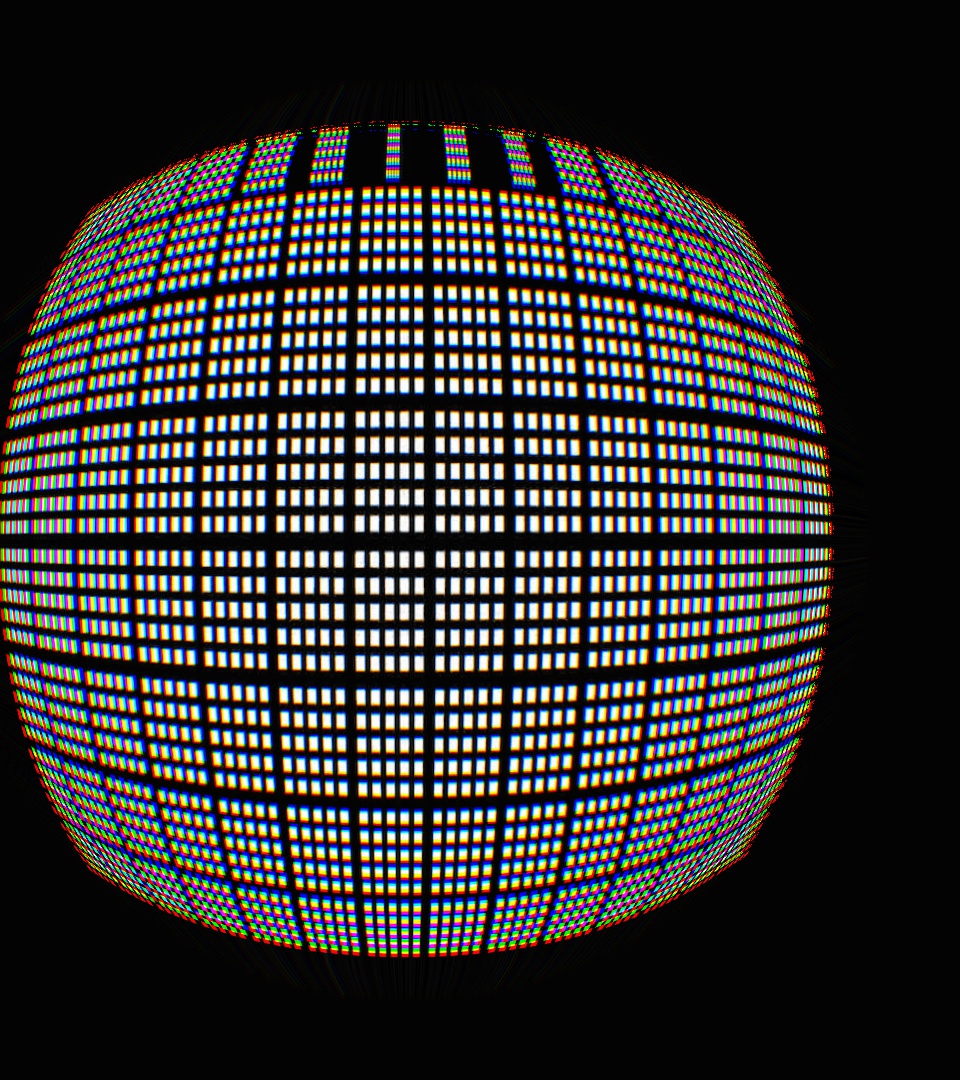
If you look at the output through the Zeiss VR One, all lines are straight and the colors at the borders are just black and white as in the image. In the Google Cardboard apps you find in the play store, the colors get bad around the borders of the screen, I think the Google Cardboard SDK does not use a different distortion for every color channel like you get from the Zeiss VR One SDK.