This forum is disabled, please visit https://forum.opencv.org
| | 1 | initial version |
I found a more compact solution, very close to this guide. It's more cumbersome, but leaves you with a very clean installation.
This entry documents the installation of OpenCV from source for both C++ and Python. We will show the procedure at the hand of OpenCV 3.4.1, but all versions will work in the same or highly similar way. Since, at the time of writing, Visual Studio 2013 is the default IDE we cannot support OpenCV versions 4, as the C++ 11 standard is not supported by the VC 2013 compiler. Furthermore, we ran into similar problems for versions >= 3.4.2 We will, however, also include a section at the bottom which extends this guide to the installation of OpenCV 4 with Visual Studio 2017.
We will run most action from the command line. Our preferred tool for this is Window's native PowerShell.
As explained above, Visual Studio 2013 with its C++ compiler, is the default IDE at the time of writing. You could also compile with a newer version of Visual Studio. However, it is not guaranteed that you can use the compiled code from applications compiled with a different Visual Studio version (and thus different compiler).
We will use git to fetch the source code. You could also run this guide without git but downloading the source code from OpenCV's Github ... could but rather simply use git.
Download and install the most current version of CMake. We run this tutorial with version 3.11.0. Check the box Add CMake to the system path for current user.
We will also compile the Python bindings. Please install Anaconda as shown here. Although we will set-up and environment for our Python installation, we need to make sure we have the correct Python version (3.6) installed in the root environment. Therefore, install Anaconda and follow the instructions on the bottom of the installation guide and set the python installation to 3.6.
Now, open an Anaconda command prompt and create a new environment with name OpenCV and install Python 3.6 and all packages coming with Anaconda (for example numpy). You can do so, by pasting conda create -y -f -n OpenCV python=3.6 anaconda into the command prompt.
Remarks on Environment: We encountered problems when the python version in the root environment did not match the version in the OpenCV environment and therefore we needed to make sure we install the correct Python version in both environments. We do think it happens as CMake finds the root environment and does not ask us for its location. We found the workaround shown above. However, if you need a different Python version in your root, we think you can run this guide and use CMake for configuration BUT before generating the build, you need to open the CMakeCache.txt file in the build folder and change the Python library and interpreter paths to those you need.
Navigate to the directory where you want to place your source code folder and clone both the OpenCV and OpenCV contribution repositories. Then check out version 3.4.1 in both repositories. You can do so from the command line by navigating to the repository of your choice, in my case C:/GIT/ and paste
git clone https://github.com/opencv/opencv.git and git clone https://github.com/opencv/opencv_contrib.git. This will create two new folders, opencv and opencv_contrib. Now navigate into opencv and paste git checkout -b 3.4.1 3.4.1 to checkout version 3.4.1 and create a branch with the same name. Repeat this within opencv_contrib.
We will use CMake to generate a Visual Studio Solution for OpenCV. CMake will take care, that all build tools such as the correct C++ compiler, the dependencies such as the Python version which we build the bindings for and the location where to place the compiled code are set correctly in the visual studio project. CMake will find many dependencies on its own, but we need to supply some of them by hand.
By default, CMake will find the Python root environment for its build, but we want to use our environment. Therefore, we need to supply the path to the OpenCV Python environment. To get this path, open an Anaconda command prompt and type conda env list -v. This will return a list of environments found on your machine and displays their path. We will need the path variable, which is displayed on the left-hand side.
We will use the command line to set all configurations. This could also be done via the CMake GUI, but for replication purpose, it is preferred to use the command line interface. Navigate to your local OpenCV repository which is located in opencv. Within this folder, create a new folder named build and within build another folder named install. Next, open a command window in the opencv/build folder and paste the code below BUT replace the string 'PATH_TO_PYTHON_ENV' with the path to your Python environment which we found in the section above. Also, make sure you insert the path with / instead of windows native **. Otherwise, CMake will report an error.
cmake -G "Visual Studio 12 2013 Win64" .. -DBUILD_SHARED_LIBS=ON -DCMAKE_INSTALL_PREFIX=C:/GIT/opencv/build/install -DINSTALL_C_EXAMPLES=ON -DINSTALL_C_EXAMPLES=ON -DINSTALL_PYTHON_EXAMPLES=ON -DOPENCV_EXTRA_MODULES_PATH=C:/GIT/opencv_contrib/modules -DPYTHON3_EXECUTABLE=PATH_TO_PYTHON_ENV/python.exe -DPYTHON3_INCLUDE_DIR=PATH_TO_PYTHON_ENV/include -DPYTHON3_LIBRARY=PATH_TO_PYTHON_ENV/libs/python36.lib -DPYTHON3_NUMPY_INCLUDE_DIRS=PATH_TO_PYTHON_ENV/Lib/site-packages/numpy/core/include -DPYTHON3_PACKAGES_PATH=PATH_TO_PYTHON_ENV/Lib/site-packageses
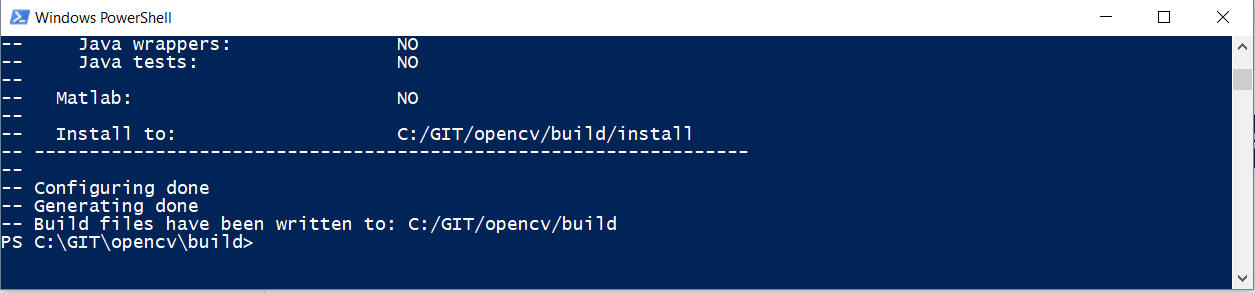
This step may take between a few seconds and a couple of minutes. Eventually, you should see the message that the build files have been written.
Next open Visual Studio 2013 and open the OpenCV solution, located in opencv/build. For the first installation, activate the release configuration, right-click the INSTALL project and build it. This step takes up to 20 min. Afterward, you should have a brand new and fresh OpenCV 3.4.1 installation on your machine, accessible from both C++ and Python.
When calling OpenCV functionality from Python, we are typically not interested in the debug options. Therefore, we will not create Python bindings for the debug configuration. Therefore, generate the build again with the altered options shown below.
cmake -G "Visual Studio 12 2013 Win64" .. -DBUILD_SHARED_LIBS=ON -DCMAKE_INSTALL_PREFIX=C:/GIT/opencv/build/install -DINSTALL_C_EXAMPLES=ON -DINSTALL_C_EXAMPLES=ON -DINSTALL_PYTHON_EXAMPLES=OFF -DOPENCV_EXTRA_MODULES_PATH=C:/GIT/opencv_contrib/modules -DBUILD_opencv_python3=OFF -DBUILD_opencv_python2=OFF -DPYTHON3_EXECUTABLE=PATH_TO_PYTHON_ENV/python.exe
The option PYTHON3_EXECUTABLE=PATH_TO_PYTHON_ENV/python.exe is left for building OpenCV but no bindings will be build.
Remark: Remember to generate a new Visual Studio project with Python bindings when you are interested in using your own code within these!
In order to use the freshly build OpenCV binaries and also build Visual Studio projects with it, we need to manipulate our environment variables.
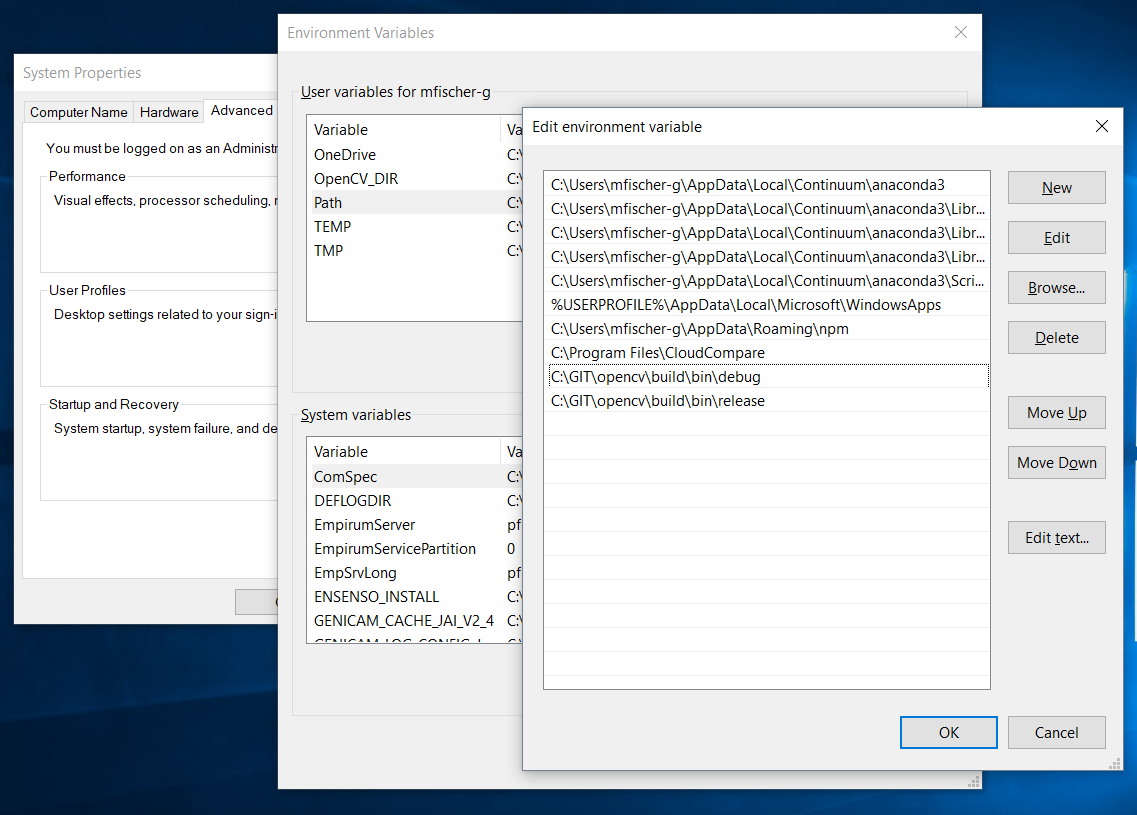
Building the OpenCV supplies us with the final binary files that we need to run our applications. To run our executables outside of Visual Studio (within VS the Additional Libraries Directories path takes care of everything), we need to add the location of the compiled OpenCV binaries to our path variables. When compiled with Visual Studio this directory is build/bin/config/. Add the directories for both release and debug (optional) configuration to your path.
You do not need to take care of switching the path between release and debug configuration, as the binary names are decorated, i.e. the release version opencv_aruco341.dll vs. the debug version opencv_aruco341d.dll.
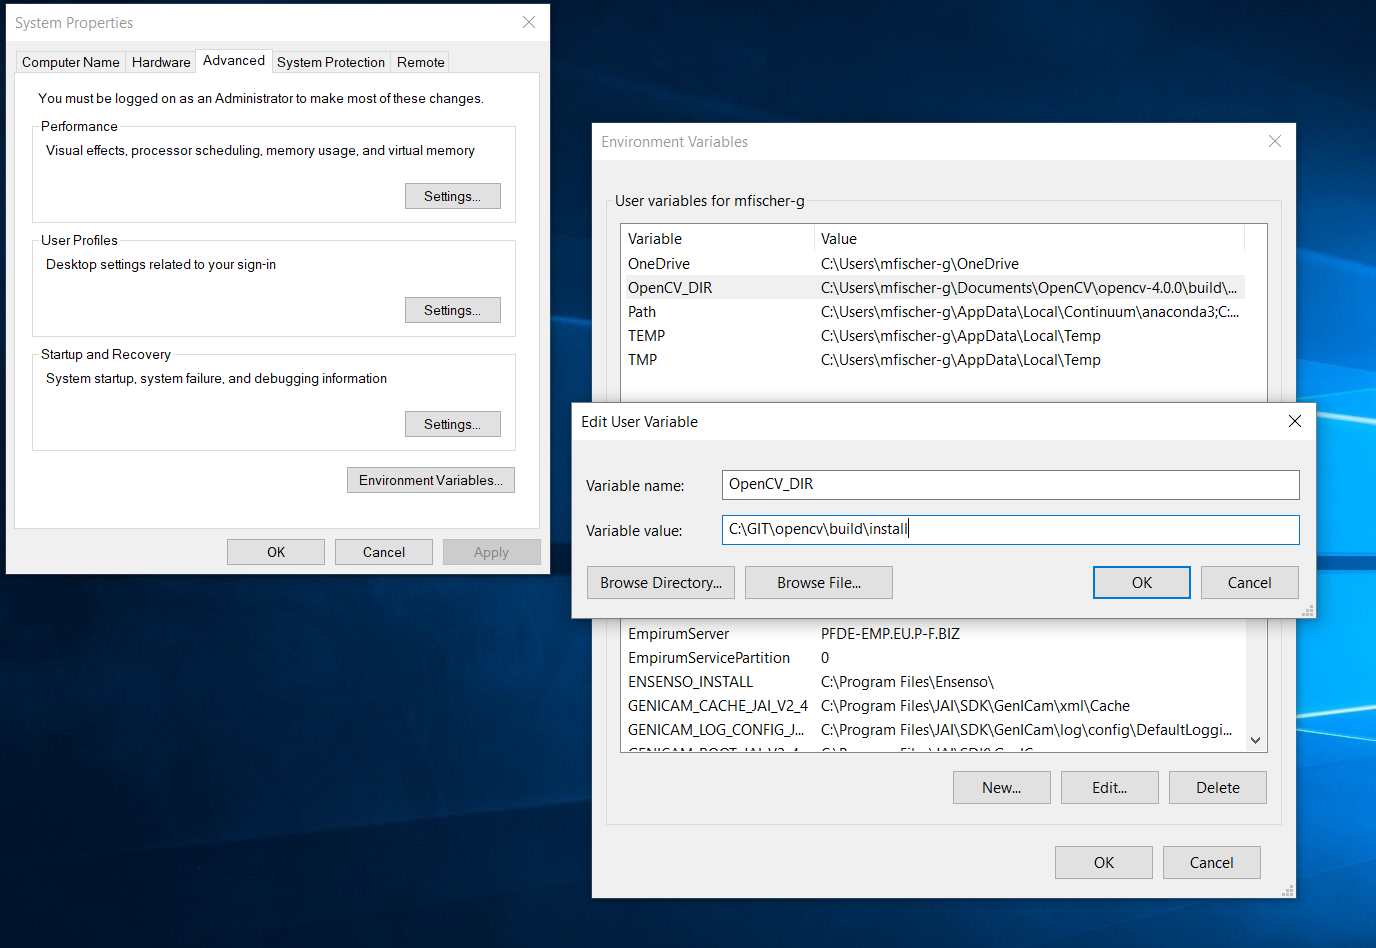
We will also use CMake to generate Visual Studio projects that have OpenCV as a dependency. CMake will look into the location specified by the 'OpenCV_DIR' environment variable to find the OpenCVConfig.cmake file which in its turn contains all the information needed to add OpenCV dependencies. In our case, we specified this location to be the install folder within opencv/build. Make sure, that when setting the environment variable you specify the absolute path, in my case C:/GIT/opencv/build/install.
Now, we want to test if our installation was successful. For this, we simply execute a program that prints OpenCV's version number. We do this for both Python and C++.
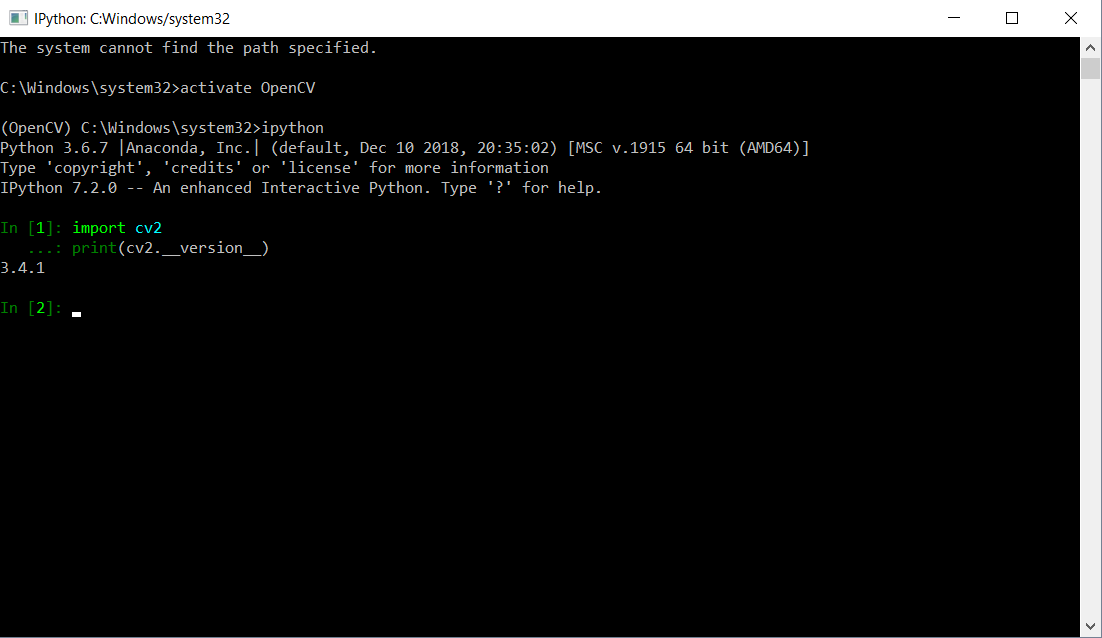
For testing our Python installation, open an Anaconda command prompt, activate the OpenCV environment and start the ipython interpreter. Afterward, import cv2 and ask for OpenCV's version number. All these steps can be done by pasting the code below into the Anaconda command prompt.
activate OpenCV ipython import cv2 print(cv2.__version__)
You should see something like shown below.
For testing our C++ installation, we create a small executable, which has OpenCV as a dependency, and prints OpenCV's version number to the window. Download both the source code
#include <opencv2 opencv.hpp="">
using namespace std; using namespace cv;
int main(int argc, char** argv ) { cout << "OpenCV version : " << CV_VERSION << endl; cout << "Major version : " << CV_MAJOR_VERSION << endl; cout << "Minor version : " << CV_MINOR_VERSION << endl; cout << "Subminor version : " << CV_SUBMINOR_VERSION << endl; }
and cmake file
cmake_minimum_required(VERSION 2.8) project( printVersion ) find_package( OpenCV REQUIRED ) include_directories( ${OpenCV_INCLUDE_DIRS} ) add_executable( printVersion printVersion.cpp ) target_link_libraries( printVersion ${OpenCV_LIBS} )``
and place them in a new folder somewhere you like. Open this folder and create a new directory called build. Open a command prompt in build and paste cmake -G "Visual Studio 12 2013 Win64"... This will create a new Visual Studio solution in the build folder. Open this solution with Visual Studio 2013 and build it. You can run the compiled executable from command and should get an output as shown in the image below.

We will use CMake to create our Visual Studio projects and take care of the dependencies. You can use the file CMakeList.txt as an example of how to include OpenCV as a dependency.
If you want to build newer versions of OpenCV, namely OpenCV 4, you will need a more modern C++ compiler than the one delivered with Visual Studio 2013. Installing OpenCV 4 follows the very same routine, except checking out a different version, and change the compiler in the CMake prompt.
cmake -G "Visual Studio 15 2017 Win64" .. -DBUILD_SHARED_LIBS=ON -DCMAKE_INSTALL_PREFIX=C:/GIT/opencv/build/install -DINSTALL_C_EXAMPLES=ON -DINSTALL_C_EXAMPLES=ON -DINSTALL_PYTHON_EXAMPLES=ON -DOPENCV_EXTRA_MODULES_PATH=C:/GIT/opencv_contrib/modules -DPYTHON3_EXECUTABLE=PATH_TO_PYTHON_ENV/python.exe -DPYTHON3_INCLUDE_DIR=PATH_TO_PYTHON_ENV/include -DPYTHON3_LIBRARY=PATH_TO_PYTHON_ENV/libs/python36.lib -DPYTHON3_NUMPY_INCLUDE_DIRS=PATH_TO_PYTHON_ENV/Lib/site-packages/numpy/core/include -DPYTHON3_PACKAGES_PATH=PATH_TO_PYTHON_ENV/Lib/site-packageses
We can also install multiple versions of OpenCV on our machine. To avoid a collision, create a new Python environment for each of these, and clone the individual versions each in a separate directory, e.g. rename opencv to opencv-3.4.1 etc. You can build each of the versions separately. Add each binary directory to your path. You don't need to worry about collisions between dlls, as their names are decorated with the version number. HOWEVER, when you use CMake to generate a project with OpenCV as a dependency, you need to set the environment variable 'OpenCV_DIR' to the according install folder.
| | 2 | No.2 Revision |
I found a more compact solution, very close to this guide. It's more cumbersome, but leaves you with a very clean installation.
This entry documents the installation of OpenCV from source for both C++ and Python. We will show the procedure at the hand of OpenCV 3.4.1, but all versions will work in the same or highly similar way. Since, at the time of writing, Visual Studio 2013 is the default IDE we cannot support OpenCV versions 4, as the C++ 11 standard is not supported by the VC 2013 compiler. Furthermore, we ran into similar problems for versions >= 3.4.2 We will, however, also include a section at the bottom which extends this guide to the installation of OpenCV 4 with Visual Studio 2017.
We will run most action from the command line. Our preferred tool for this is Window's native PowerShell.
As explained above, Visual Studio 2013 with its C++ compiler, is the default IDE at the time of writing. You could also compile with a newer version of Visual Studio. However, it is not guaranteed that you can use the compiled code from applications compiled with a different Visual Studio version (and thus different compiler).
We will use git to fetch the source code. You could also run this guide without git but downloading the source code from OpenCV's Github ... could but rather simply use git.
Download and install the most current version of CMake. We run this tutorial with version 3.11.0. Check the box Add CMake to the system path for current user.
We will also compile the Python bindings. Please install Anaconda as shown here. Although we will set-up and environment for our Python installation, we need to make sure we have the correct Python version (3.6) installed in the root environment. Therefore, install Anaconda and follow the instructions on the bottom of the installation guide and set the python installation to 3.6.
Now, open an Anaconda command prompt and create a new environment with name OpenCV and install Python 3.6 and all packages coming with Anaconda (for example numpy). You can do so, by pasting conda create -y -f -n OpenCV python=3.6 anaconda into the command prompt.
Remarks on Environment: We encountered problems when the python version in the root environment did not match the version in the OpenCV environment and therefore we needed to make sure we install the correct Python version in both environments. We do think it happens as CMake finds the root environment and does not ask us for its location. We found the workaround shown above. However, if you need a different Python version in your root, we think you can run this guide and use CMake for configuration BUT before generating the build, you need to open the CMakeCache.txt file in the build folder and change the Python library and interpreter paths to those you need.
Navigate to the directory where you want to place your source code folder and clone both the OpenCV and OpenCV contribution repositories. Then check out version 3.4.1 in both repositories. You can do so from the command line by navigating to the repository of your choice, in my case C:/GIT/ and paste
git clone https://github.com/opencv/opencv.git and git clone https://github.com/opencv/opencv_contrib.git. This will create two new folders, opencv and opencv_contrib. Now navigate into opencv and paste git checkout -b 3.4.1 3.4.1 to checkout version 3.4.1 and create a branch with the same name. Repeat this within opencv_contrib.
We will use CMake to generate a Visual Studio Solution for OpenCV. CMake will take care, that all build tools such as the correct C++ compiler, the dependencies such as the Python version which we build the bindings for and the location where to place the compiled code are set correctly in the visual studio project. CMake will find many dependencies on its own, but we need to supply some of them by hand.
By default, CMake will find the Python root environment for its build, but we want to use our environment. Therefore, we need to supply the path to the OpenCV Python environment. To get this path, open an Anaconda command prompt and type conda env list -v. This will return a list of environments found on your machine and displays their path. We will need the path variable, which is displayed on the left-hand side.
We will use the command line to set all configurations. This could also be done via the CMake GUI, but for replication purpose, it is preferred to use the command line interface. Navigate to your local OpenCV repository which is located in opencv. Within this folder, create a new folder named build and within build another folder named install. Next, open a command window in the opencv/build folder and paste the code below BUT replace the string 'PATH_TO_PYTHON_ENV' with the path to your Python environment which we found in the section above. Also, make sure you insert the path with / instead of windows native **. Otherwise, CMake will report an error.
cmake -G "Visual Studio 12 2013 Win64" .. -DBUILD_SHARED_LIBS=ON -DCMAKE_INSTALL_PREFIX=C:/GIT/opencv/build/install -DINSTALL_C_EXAMPLES=ON -DINSTALL_C_EXAMPLES=ON -DINSTALL_PYTHON_EXAMPLES=ON -DOPENCV_EXTRA_MODULES_PATH=C:/GIT/opencv_contrib/modules -DPYTHON3_EXECUTABLE=PATH_TO_PYTHON_ENV/python.exe -DPYTHON3_INCLUDE_DIR=PATH_TO_PYTHON_ENV/include -DPYTHON3_LIBRARY=PATH_TO_PYTHON_ENV/libs/python36.lib -DPYTHON3_NUMPY_INCLUDE_DIRS=PATH_TO_PYTHON_ENV/Lib/site-packages/numpy/core/include -DPYTHON3_PACKAGES_PATH=PATH_TO_PYTHON_ENV/Lib/site-packageses
This step may take between a few seconds and a couple of minutes. Eventually, you should see the message that the build files have been written.
Next open Visual Studio 2013 and open the OpenCV solution, located in opencv/build. For the first installation, activate the release configuration, right-click the INSTALL project and build it. This step takes up to 20 min. Afterward, you should have a brand new and fresh OpenCV 3.4.1 installation on your machine, accessible from both C++ and Python.
When calling OpenCV functionality from Python, we are typically not interested in the debug options. Therefore, we will not create Python bindings for the debug configuration. Therefore, generate the build again with the altered options shown below.
cmake -G "Visual Studio 12 2013 Win64" .. -DBUILD_SHARED_LIBS=ON -DCMAKE_INSTALL_PREFIX=C:/GIT/opencv/build/install -DINSTALL_C_EXAMPLES=ON -DINSTALL_C_EXAMPLES=ON -DINSTALL_PYTHON_EXAMPLES=OFF -DOPENCV_EXTRA_MODULES_PATH=C:/GIT/opencv_contrib/modules -DBUILD_opencv_python3=OFF -DBUILD_opencv_python2=OFF -DPYTHON3_EXECUTABLE=PATH_TO_PYTHON_ENV/python.exe
The option PYTHON3_EXECUTABLE=PATH_TO_PYTHON_ENV/python.exe is left for building OpenCV but no bindings will be build.
Remark: Remember to generate a new Visual Studio project with Python bindings when you are interested in using your own code within these!
In order to use the freshly build OpenCV binaries and also build Visual Studio projects with it, we need to manipulate our environment variables.
Building the OpenCV supplies us with the final binary files that we need to run our applications. To run our executables outside of Visual Studio (within VS the Additional Libraries Directories path takes care of everything), we need to add the location of the compiled OpenCV binaries to our path variables. When compiled with Visual Studio this directory is build/bin/config/. Add the directories for both release and debug (optional) configuration to your path.
You do not need to take care of switching the path between release and debug configuration, as the binary names are decorated, i.e. the release version opencv_aruco341.dll vs. the debug version opencv_aruco341d.dll.
We will also use CMake to generate Visual Studio projects that have OpenCV as a dependency. CMake will look into the location specified by the 'OpenCV_DIR' environment variable to find the OpenCVConfig.cmake file which in its turn contains all the information needed to add OpenCV dependencies. In our case, we specified this location to be the install folder within opencv/build. Make sure, that when setting the environment variable you specify the absolute path, in my case C:/GIT/opencv/build/install.
Now, we want to test if our installation was successful. For this, we simply execute a program that prints OpenCV's version number. We do this for both Python and C++.
For testing our Python installation, open an Anaconda command prompt, activate the OpenCV environment and start the ipython interpreter. Afterward, import cv2 and ask for OpenCV's version number. All these steps can be done by pasting the code below into the Anaconda command prompt.
You should see something like shown below.
For testing our C++ installation, we create a small executable, which has OpenCV as a dependency, and prints OpenCV's version number to the window. Download both the source code
and cmake file
and place them in a new folder somewhere you like. Open this folder and create a new directory called build. Open a command prompt in build and paste cmake -G "Visual Studio 12 2013 Win64"... This will create a new Visual Studio solution in the build folder. Open this solution with Visual Studio 2013 and build it. You can run the compiled executable from command and should get an output as shown in the image below.
We will use CMake to create our Visual Studio projects and take care of the dependencies. You can use the file CMakeList.txt as an example of how to include OpenCV as a dependency.
If you want to build newer versions of OpenCV, namely OpenCV 4, you will need a more modern C++ compiler than the one delivered with Visual Studio 2013. Installing OpenCV 4 follows the very same routine, except checking out a different version, and change the compiler in the CMake prompt.
cmake -G "Visual Studio 15 2017 Win64" .. -DBUILD_SHARED_LIBS=ON -DCMAKE_INSTALL_PREFIX=C:/GIT/opencv/build/install -DINSTALL_C_EXAMPLES=ON -DINSTALL_C_EXAMPLES=ON -DINSTALL_PYTHON_EXAMPLES=ON -DOPENCV_EXTRA_MODULES_PATH=C:/GIT/opencv_contrib/modules -DPYTHON3_EXECUTABLE=PATH_TO_PYTHON_ENV/python.exe -DPYTHON3_INCLUDE_DIR=PATH_TO_PYTHON_ENV/include -DPYTHON3_LIBRARY=PATH_TO_PYTHON_ENV/libs/python36.lib -DPYTHON3_NUMPY_INCLUDE_DIRS=PATH_TO_PYTHON_ENV/Lib/site-packages/numpy/core/include -DPYTHON3_PACKAGES_PATH=PATH_TO_PYTHON_ENV/Lib/site-packageses
We can also install multiple versions of OpenCV on our machine. To avoid a collision, create a new Python environment for each of these, and clone the individual versions each in a separate directory, e.g. rename opencv to opencv-3.4.1 etc. You can build each of the versions separately. Add each binary directory to your path. You don't need to worry about collisions between dlls, as their names are decorated with the version number. HOWEVER, when you use CMake to generate a project with OpenCV as a dependency, you need to set the environment variable 'OpenCV_DIR' to the according install folder.