This forum is disabled, please visit https://forum.opencv.org
| | 1 | initial version |
I can look into it and adapt the C++ samples to Python, if there's any interest. But it will take some days or even until the weekend, as I work full-time in a different area and can only do this in my spare time.
If you are in very urgent need for face recognition with Python, you can also have a look at my Guide To Face Recognition with Python (Download as PDF). You'll find the source code in this document (and the PDF I linked) at:
This is the original document I based the C++ tutorial on, so it might help while I am adapting the OpenCV Python samples.
| | 2 | No.2 Revision |
I can look into it and adapt the C++ samples to Python, if there's any interest. But it will take some days or even until the weekend, as I work full-time in a different area and can only do this in my spare time.
If In the meantime, if you are in very urgent need for face recognition with Python, then you can also have a look at my Guide To Face Recognition with Python (Download as PDF). It gives full source code examples for Eigenfaces and Fisherfaces with NumPy. You'll find the source code in this document (and the PDF I linked) at:
This is the original document I based the C++ tutorial on, so it might help while I am adapting the OpenCV Python samples.samples. I also have an advanced face recognition framework for Python, but I don't have time to write a documentation, so the Guide might be a better start:
| | 3 | No.3 Revision |
Update (Just so you know I had a look at it).
Actually I got the same error, and it's due to how I pass the data in C++ as cv::InputArray. I have to use cv::InputArrayOfArrays, this doesn't affect the C++ version, but is going to make the wrapper produce the correct code. I'll update this post, when it's updated.
Original post
I can look into it and adapt the C++ samples to Python, if there's any interest. But it will take some days or even until the weekend, as I work full-time in a different area and can only do this in my spare time.
In the meantime, if you are in very urgent need for face recognition with Python, then you can also have a look at my Guide To Face Recognition with Python (Download as PDF). It gives full source code examples for Eigenfaces and Fisherfaces with NumPy. You'll find the source code (and the PDF I linked) at:
This is the original document I based the C++ tutorial on, so it might help while I am adapting the OpenCV Python samples. I also have an advanced face recognition framework for Python, but I don't have time to write a documentation, so the Guide might be a better start:
| | 4 | No.4 Revision |
Update (Just The Python wrapper for cv::FaceRecognizer works now. First of all thanks to Eric Christiansen for writing the Python wrapper for the contrib module in the first place! Then with some help from Vadim Pisarevsky, it was an easy fix (I needed to change 1! parameter). So if you update your git repository and compile... it's supposed to work.
The example in this tutorial is going to show how to work with the Eigenfaces model in OpenCV's Python wrapper (same for the other models). You are going to learn how to train a FaceRecognizer on your data, get a prediction (with associated confidence) from the model and see how to access the model internal data. You'll also see how to plot the Eigenfaces, because it's what most of the people want to see.
You'll find the demo in samples/python2 folder:
I'll add this tutorial to the official documentation, as soon as my job allows. Feel free to comment if you have questions or any other requests.
We aren't doing a toy example, so you know I had a look at it).
Actually I got the same error, and it's due to how I pass the data in C++ as cv::InputArray. you'll need some image data. For sake of simplicity I have to use cv::InputArrayOfArrays, this doesn't affect the C++ version, but assumed, that the images (the faces, persons you want to recognize) are given in folders. So imagine I have a folder (a dataset) images, with the subfolders person1, person2 and so on:
philipp@mango:~/facerec/data/images$ tree -L 2 | head -n 20
.
|-- person1
|   |-- 1.jpg
|   |-- 2.jpg
|   |-- 3.jpg
|   |-- 4.jpg
|-- person2
|   |-- 1.jpg
|   |-- 2.jpg
|   |-- 3.jpg
|   |-- 4.jpg

[...]
One of the public available datasets, that is already coming in such a folder structure is the AT&T Facedatabase, available at:
Once unpacked it is going to make the wrapper produce the correct code. I'll update look like this post, when it's updated.(on my filesystem it is unpacked to /home/philipp/facerec/data/at/, your path is different!):
Original post
philipp@mango:~/facerec/data/at$ tree .
.
|-- README
|-- s1
|   |-- 1.pgm
|   |-- 2.pgm
[...]
|   `-- 10.pgm
|-- s2
|   |-- 1.pgm
|   |-- 2.pgm
[...]
|   `-- 10.pgm
|-- s3
|   |-- 1.pgm
|   |-- 2.pgm
[...]
|   `-- 10.pgm

...

40 directories, 401 files
I can look into it and adapt the C++ samples to Python, if there's any interest. But it will take am going to use some days or even until the weekend, as I work full-time in a different area and can only do this in functions from my spare time.
In the meantime, if you are in very urgent need for face recognition with Python, then you can also have a look at my Guide To Face Recognition with Python (Download as PDFPython). It gives . These functions will make it much easier to work with the image data, like reading the folder hierarchie and generating plots. The script outputs a prediction, the names of model data you can access and two images:
You run the application with:
python facerec_demo.py </path/to/your/images/>
So if I have extracted the AT&T Facedatabase to /home/philipp/data/at, the line would look like this:
python facerec_demo.py /home/philipp/data/at
First of all I'll show the full sourcecode listing of facerec_demo.py and then the eigenfaces generated by the script. You'll see, they are equivalent to those in the C++ demos.
#!/usr/bin/env python
# Software License Agreement (BSD License)
#
# Copyright (c) 2012, Philipp Wagner
# All rights reserved.
#
# Redistribution and use in source and binary forms, with or without
# modification, are permitted provided that the following conditions
# are met:
#
# * Redistributions of source code examples must retain the above copyright
# notice, this list of conditions and the following disclaimer.
# * Redistributions in binary form must reproduce the above
# copyright notice, this list of conditions and the following
# disclaimer in the documentation and/or other materials provided
# with the distribution.
# * Neither the name of the author nor the names of its
# contributors may be used to endorse or promote products derived
# from this software without specific prior written permission.
#
# THIS SOFTWARE IS PROVIDED BY THE COPYRIGHT HOLDERS AND CONTRIBUTORS
# "AS IS" AND ANY EXPRESS OR IMPLIED WARRANTIES, INCLUDING, BUT NOT
# LIMITED TO, THE IMPLIED WARRANTIES OF MERCHANTABILITY AND FITNESS
# FOR A PARTICULAR PURPOSE ARE DISCLAIMED. IN NO EVENT SHALL THE
# COPYRIGHT OWNER OR CONTRIBUTORS BE LIABLE FOR ANY DIRECT, INDIRECT,
# INCIDENTAL, SPECIAL, EXEMPLARY, OR CONSEQUENTIAL DAMAGES (INCLUDING,
# BUT NOT LIMITED TO, PROCUREMENT OF SUBSTITUTE GOODS OR SERVICES;
# LOSS OF USE, DATA, OR PROFITS; OR BUSINESS INTERRUPTION) HOWEVER
# CAUSED AND ON ANY THEORY OF LIABILITY, WHETHER IN CONTRACT, STRICT
# LIABILITY, OR TORT (INCLUDING NEGLIGENCE OR OTHERWISE) ARISING IN
# ANY WAY OUT OF THE USE OF THIS SOFTWARE, EVEN IF ADVISED OF THE
# POSSIBILITY OF SUCH DAMAGE.
import os
import sys
import PIL.Image as Image
import numpy as np
import matplotlib.pyplot as plt
import matplotlib.cm as cm
import cv2
def normalize(X, low, high, dtype=None):
"""Normalizes a given array in X to a value between low and high."""
X = np.asarray(X)
minX, maxX = np.min(X), np.max(X)
# normalize to [0...1].
X = X - float(minX)
X = X / float((maxX - minX))
# scale to [low...high].
X = X * (high-low)
X = X + low
if dtype is None:
return np.asarray(X)
return np.asarray(X, dtype=dtype)
def read_images(path, sz=None):
"""Reads the images in a given folder, resizes images on the fly if size is given.
Args:
path: Path to a folder with subfolders representing the subjects (persons).
sz: A tuple with the size Resizes
Returns:
A list [X,y]
X: The images, which is a Python list of numpy arrays.
y: The corresponding labels (the unique number of the subject, person) in a Python list.
"""
c = 0
X,y = [], []
for Eigenfaces and Fisherfaces dirname, dirnames, filenames in os.walk(path):
for subdirname in dirnames:
subject_path = os.path.join(dirname, subdirname)
for filename in os.listdir(subject_path):
try:
im = Image.open(os.path.join(subject_path, filename))
im = im.convert("L")
# resize to given size (if given)
if (sz is not None):
im = im.resize(sz, Image.ANTIALIAS)
X.append(np.asarray(im, dtype=np.uint8))
y.append(c)
except IOError, (errno, strerror):
print "I/O error({0}): {1}".format(errno, strerror)
except:
print "Unexpected error:", sys.exc_info()[0]
raise
c = c+1
return [X,y]
def create_font(fontname='Tahoma', fontsize=10):
"""Creates a font for the subplot."""
return { 'fontname': fontname, 'fontsize':fontsize }
def subplot(title, images, rows, cols, sptitle="subplot", sptitles=[], colormap=cm.gray, ticks_visible=True, filename=None):
"""This will ease creating a subplot with NumPy. matplotlib a lot for us."""
fig = plt.figure()
# main title
fig.text(.5, .95, title, horizontalalignment='center')
for i in xrange(len(images)):
ax0 = fig.add_subplot(rows,cols,(i+1))
plt.setp(ax0.get_xticklabels(), visible=False)
plt.setp(ax0.get_yticklabels(), visible=False)
if len(sptitles) == len(images):
plt.title("%s #%s" % (sptitle, str(sptitles[i])), create_font('Tahoma',10))
else:
plt.title("%s #%d" % (sptitle, (i+1)), create_font('Tahoma',10))
plt.imshow(np.asarray(images[i]), cmap=colormap)
if filename is None:
plt.show()
else:
fig.savefig(filename)
def imsave(image, title="", filename=None):
"""Saves or shows (if no filename is given) an image."""
fig = plt.figure()
plt.imshow(np.asarray(image))
plt.title(title, create_font('Tahoma',10))
if filename is None:
plt.show()
else:
fig.savefig(filename)
if __name__ == "__main__":
# You'll find the need at least a path to your image data, please see
# the tutorial coming with this source code (and the PDF on how to prepare
# your image data:
if len(sys.argv) != 2:
print "USAGE: facerec_demo.py </path/to/images>"
sys.exit()
# Now read in the image data. This must be a valid path!
[X,y] = read_images(sys.argv[1])
# Create the Eigenfaces model. We are going to use the default
# parameters for this simple example, please read the documentation
# for thresholding:
model = cv2.createEigenFaceRecognizer()
# Read
# Learn the model. Remember our function returns Python lists,
# so we use np.asarray to turn them into NumPy lists to make
# the OpenCV wrapper happy:
model.train(np.asarray(X), np.asarray(y))
# We now get a prediction from the model! In reality you
# should always use unseen images for testing your model.
# But so many people were confused, when I linked) at:sliced an image
# off in the C++ version, so I am just using an image we
# have trained with.
#
# model.predict is going to return the predicted label and
# the associated confidence:
[p_label, p_confidence] = model.predict(np.asarray(X[0]))
# Print it:
print "Predicted label = %d (confidence=%.2f)" % (p_label, p_confidence)
# Cool! Finally we'll plot the Eigenfaces, because that's
# what most people read in the papers are keen to see.
#
# Just like in C++ you have access to all model internal
# data, because the cv::FaceRecognizer is a cv::Algorithm.
#
# You can see the available parameters with getParams():
print model.getParams()
# Now let's get some data:
mean = model.getMat("mean")
eigenvectors = model.getMat("eigenvectors")
# We'll save the mean, by first normalizing it:
mean_norm = normalize(mean, 0, 255)
mean_resized = mean_norm.reshape(X[0].shape)
imsave(mean_resized, "Mean Face", "mean.png")
# Turn the first (at most) 16 eigenvectors into grayscale
# images. You could also use cv::normalize here, but sticking
# to NumPy is much easier for now.
# Note: eigenvectors are stored by column:
SubplotData = []
for i in xrange(min(len(X), 16)):
eigenvector_i = eigenvectors[:,i].reshape(X[0].shape)
SubplotData.append(normalize(eigenvector_i, 0, 255))
# Plot them and store the plot to "python_eigenfaces.png"
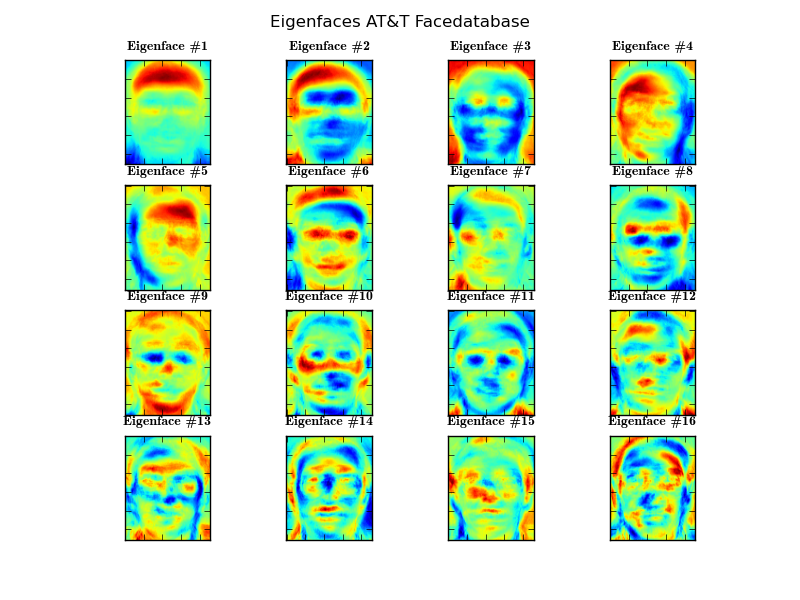
subplot(title="Eigenfaces AT&T Facedatabase", images=SubplotData, rows=4, cols=4, sptitle="Eigenface", colormap=cm.jet, filename="eigenfaces.png")
| | 5 | No.5 Revision |
The Python wrapper for cv::FaceRecognizer works now. First of all thanks to Eric Christiansen for writing the Python wrapper for the contrib module in the first place! Then with some help from Vadim Pisarevsky, it was an easy fix (I needed to change 1! parameter). So if you update your git repository and compile... it's supposed to work.
The example in this tutorial is going to show how to work with the Eigenfaces model in OpenCV's Python wrapper (same for the other models). You are going to learn how to train a FaceRecognizer on your data, get a prediction (with associated confidence) from the model and see how to access the model internal data. You'll also see how to plot the Eigenfaces, because it's what most of the people want to see.
You'll find the demo in samples/python2 folder:
I'll add this tutorial to the official documentation, as soon as my job allows. Feel free to comment if you have questions or any other requests.
We aren't doing a toy example, so you'll need some image data. For sake of simplicity I have assumed, that the images (the faces, persons you want to recognize) are given in folders. So imagine I have a folder (a dataset) images, with the subfolders person1, person2 and so on:
philipp@mango:~/facerec/data/images$ tree -L 2 | head -n 20
.
|-- person1
|   |-- 1.jpg
|   |-- 2.jpg
|   |-- 3.jpg
|   |-- 4.jpg
|-- person2
|   |-- 1.jpg
|   |-- 2.jpg
|   |-- 3.jpg
|   |-- 4.jpg

[...]
One of the public available datasets, that is already coming in such a folder structure is the AT&T Facedatabase, available at:
Once unpacked it is going to look like this (on my filesystem it is unpacked to /home/philipp/facerec/data/at/, your path is different!):
philipp@mango:~/facerec/data/at$ tree .
.
|-- README
|-- s1
|   |-- 1.pgm
|   |-- 2.pgm
[...]
|   `-- 10.pgm
|-- s2
|   |-- 1.pgm
|   |-- 2.pgm
[...]
|   `-- 10.pgm
|-- s3
|   |-- 1.pgm
|   |-- 2.pgm
[...]
|   `-- 10.pgm

...

40 directories, 401 files
I am going to use some functions from my Guide To Face Recognition with Python. These functions will make it much easier to work with the image data, like reading the folder hierarchie and generating plots. The script outputs a prediction, the names of model data you can access and two images:
You run the application with:
python facerec_demo.py </path/to/your/images/>
So if I have extracted the AT&T Facedatabase to /home/philipp/data/at, the line would look like this:
python facerec_demo.py /home/philipp/data/at
First of all I'll show the full sourcecode listing of facerec_demo.py and then the eigenfaces generated by the script. You'll see, they are equivalent to those in the C++ demos.
#!/usr/bin/env python
# Software License Agreement (BSD License)
#
# Copyright (c) 2012, Philipp Wagner
# All rights reserved.
#
# Redistribution and use in source and binary forms, with or without
# modification, are permitted provided that the following conditions
# are met:
#
#  * Redistributions of source code must retain the above copyright
#    notice, this list of conditions and the following disclaimer.
#  * Redistributions in binary form must reproduce the above
#    copyright notice, this list of conditions and the following
#    disclaimer in the documentation and/or other materials provided
#    with the distribution.
#  * Neither the name of the author nor the names of its
#    contributors may be used to endorse or promote products derived
#    from this software without specific prior written permission.
#
# THIS SOFTWARE IS PROVIDED BY THE COPYRIGHT HOLDERS AND CONTRIBUTORS
# "AS IS" AND ANY EXPRESS OR IMPLIED WARRANTIES, INCLUDING, BUT NOT
# LIMITED TO, THE IMPLIED WARRANTIES OF MERCHANTABILITY AND FITNESS
# FOR A PARTICULAR PURPOSE ARE DISCLAIMED. IN NO EVENT SHALL THE
# COPYRIGHT OWNER OR CONTRIBUTORS BE LIABLE FOR ANY DIRECT, INDIRECT,
# INCIDENTAL, SPECIAL, EXEMPLARY, OR CONSEQUENTIAL DAMAGES (INCLUDING,
# BUT NOT LIMITED TO, PROCUREMENT OF SUBSTITUTE GOODS OR SERVICES;
# LOSS OF USE, DATA, OR PROFITS; OR BUSINESS INTERRUPTION) HOWEVER
# CAUSED AND ON ANY THEORY OF LIABILITY, WHETHER IN CONTRACT, STRICT
# LIABILITY, OR TORT (INCLUDING NEGLIGENCE OR OTHERWISE) ARISING IN
# ANY WAY OUT OF THE USE OF THIS SOFTWARE, EVEN IF ADVISED OF THE
# POSSIBILITY OF SUCH DAMAGE.


import os
import sys

import PIL.Image as Image

import numpy as np

import matplotlib.pyplot as plt
import matplotlib.cm as cm

import cv2

def normalize(X, low, high, dtype=None):
    """Normalizes a given array in X to a value between low and high."""
    X = np.asarray(X)
    minX, maxX = np.min(X), np.max(X)
    # normalize to [0...1].
    X = X - float(minX)
    X = X / float((maxX - minX))
    # scale to [low...high].
    X = X * (high-low)
    X = X + low
    if dtype is None:
        return np.asarray(X)
    return np.asarray(X, dtype=dtype)

def read_images(path, sz=None):
    """Reads the images in a given folder, resizes images on the fly if size is given.

    Args:
        path: Path to a folder with subfolders representing the subjects (persons).
        sz: A tuple with the size Resizes

    Returns:
        A list [X,y]

            X: The images, which is a Python list of numpy arrays.
            y: The corresponding labels (the unique number of the subject, person) in a Python list.
    """
    c = 0
    X,y = [], []
    for dirname, dirnames, filenames in os.walk(path):
        for subdirname in dirnames:
            subject_path = os.path.join(dirname, subdirname)
            for filename in os.listdir(subject_path):
                try:
                    im = Image.open(os.path.join(subject_path, filename))
                    im = im.convert("L")
                    # resize to given size (if given)
                    if (sz is not None):
                        im = im.resize(sz, Image.ANTIALIAS)
                    X.append(np.asarray(im, dtype=np.uint8))
                    y.append(c)
                except IOError, (errno, strerror):
                    print "I/O error({0}): {1}".format(errno, strerror)
                except:
                    print "Unexpected error:", sys.exc_info()[0]
                    raise
            c = c+1
    return [X,y]

def create_font(fontname='Tahoma', fontsize=10):
    """Creates a font for the subplot."""
    return { 'fontname': fontname, 'fontsize':fontsize }

def subplot(title, images, rows, cols, sptitle="subplot", sptitles=[], colormap=cm.gray, ticks_visible=True, filename=None):
    """This will ease creating a subplot with matplotlib a lot for us."""
    fig = plt.figure()
    # main title
    fig.text(.5, .95, title, horizontalalignment='center')
    for i in xrange(len(images)):
        ax0 = fig.add_subplot(rows,cols,(i+1))
        plt.setp(ax0.get_xticklabels(), visible=False)
        plt.setp(ax0.get_yticklabels(), visible=False)
        if len(sptitles) == len(images):
            plt.title("%s #%s" % (sptitle, str(sptitles[i])), create_font('Tahoma',10))
        else:
            plt.title("%s #%d" % (sptitle, (i+1)), create_font('Tahoma',10))
        plt.imshow(np.asarray(images[i]), cmap=colormap)
    if filename is None:
        plt.show()
    else:
        fig.savefig(filename)

def imsave(image, title="", filename=None):
    """Saves or shows (if no filename is given) an image."""
    fig = plt.figure()
    plt.imshow(np.asarray(image))
    plt.title(title, create_font('Tahoma',10))
    if filename is None:
        plt.show()
    else:
        fig.savefig(filename)

if __name__ == "__main__":
    # You'll need at least a path to your image data, please see
    # the tutorial coming with this source code on how to prepare
    # your image data:
    if len(sys.argv) != 2:
        print "USAGE: facerec_demo.py </path/to/images>"
        sys.exit()
    # Now read in the image data. This must be a valid path!
    [X,y] = read_images(sys.argv[1])
    # Create the Eigenfaces model. We are going to use the default
    # parameters for this simple example, please read the documentation
    # for thresholding:
    model = cv2.createEigenFaceRecognizer()
    # Read
    # Learn the model. Remember our function returns Python lists,
    # so we use np.asarray to turn them into NumPy lists to make
    # the OpenCV wrapper happy:
    model.train(np.asarray(X), np.asarray(y))
    # We now get a prediction from the model! In reality you
    # should always use unseen images for testing your model.
    # But so many people were confused, when I sliced an image
    # off in the C++ version, so I am just using an image we
    # have trained with.
    #
    # model.predict is going to return the predicted label and
    # the associated confidence:
    [p_label, p_confidence] = model.predict(np.asarray(X[0]))
    # Print it:
    print "Predicted label = %d (confidence=%.2f)" % (p_label, p_confidence)
    # Cool! Finally we'll plot the Eigenfaces, because that's
    # what most people read in the papers are keen to see.
    #
    # Just like in C++ you have access to all model internal
    # data, because the cv::FaceRecognizer is a cv::Algorithm.
    #
    # You can see the available parameters with getParams():
    print model.getParams()
    # Now let's get some data:
    mean = model.getMat("mean")
    eigenvectors = model.getMat("eigenvectors")
    # We'll save the mean, by first normalizing it:
    mean_norm = normalize(mean, 0, 255)
    mean_resized = mean_norm.reshape(X[0].shape)
    imsave(mean_resized, "Mean Face", "mean.png")
    # Turn the first (at most) 16 eigenvectors into grayscale
    # images. You could also use cv::normalize here, but sticking
    # to NumPy is much easier for now.
    # Note: eigenvectors are stored by column:
    SubplotData = []
    for i in xrange(min(len(X), 16)):
        eigenvector_i = eigenvectors[:,i].reshape(X[0].shape)
        SubplotData.append(normalize(eigenvector_i, 0, 255))
    # Plot them and store the plot to "python_eigenfaces.png"
    subplot(title="Eigenfaces AT&T Facedatabase", images=SubplotData, rows=4, cols=4, sptitle="Eigenface", colormap=cm.jet, filename="eigenfaces.png")
| | 6 | updated to remove matplotlib dependencies |
The Python wrapper for cv::FaceRecognizer works now. First of all thanks to Eric Christiansen for writing the Python wrapper for the contrib module in the first place! Then with some help from Vadim Pisarevsky, it was an easy fix (I needed to change 1! parameter). So if you update and compile your git repository and compile... it's supposed to work.
The example in this tutorial is going to show how to work with the Eigenfaces model in OpenCV's Python wrapper (same for the other models). wrapper. You are going to learn how to train a FaceRecognizer on your data, get a prediction (with associated confidence) from the model and see how to access the model internal data. You'll also see how to plot the Eigenfaces, because it's what most of the people want to see.
You'll find the demo in samples/python2 folder:
I'll add this tutorial to the official documentation, as soon as my job allows. Feel free to comment if you have questions or any other requests.
We aren't doing a toy example, so you'll need some image data. For sake of simplicity I have assumed, that the images (the faces, persons you want to recognize) are given in folders. So imagine I have a folder (a dataset) images, with the subfolders person1, person2 and so on:
philipp@mango:~/facerec/data/images$ tree -L 2 | head -n 20
.
|-- person1
|   |-- 1.jpg
|   |-- 2.jpg
|   |-- 3.jpg
|   |-- 4.jpg
|-- person2
|   |-- 1.jpg
|   |-- 2.jpg
|   |-- 3.jpg
|   |-- 4.jpg

[...]
One of the public available datasets, that is already coming in such a folder structure is the AT&T Facedatabase, available at:
Once unpacked it is going to look like this (on my filesystem it is unpacked to /home/philipp/facerec/data/at/, your path is different!):
philipp@mango:~/facerec/data/at$ tree .
.
|-- README
|-- s1
|   |-- 1.pgm
|   |-- 2.pgm
[...]
|   `-- 10.pgm
|-- s2
|   |-- 1.pgm
|   |-- 2.pgm
[...]
|   `-- 10.pgm
|-- s3
|   |-- 1.pgm
|   |-- 2.pgm
[...]
|   `-- 10.pgm

...

40 directories, 401 files
I am going to use some functions from my Guide To Face Recognition with Python. These functions will make it much easier to work with the image data, like reading the folder hierarchie and generating plots. hierarchie. The script outputs a prediction, the names of available model data you can access data, the mean face and two images:the first (at most) 16 eigenfaces:
You run can either show the results or save them to disk. Run the application with:
python facerec_demo.py </path/to/your/images/>
</path/to/your/images/> [</path/to/store/results/at>]
So if I have extracted the AT&T Facedatabase to /home/philipp/data/at, the line would look /home/philipp/facerec/data/at and I want to show the results I call it like this:
python facerec_demo.py /home/philipp/data/at
/home/philipp/facerec/data/at
If I have extracted the AT&T Facedatabase to /home/philipp/facerec/data/at and I want to save the results to /home/philipp/out_dir I call it like this:
python facerec_demo.py /home/philipp/facerec/data/at /home/philipp/out_dir
First of all I'll show the full sourcecode listing of facerec_demo.py and then the eigenfaces generated by the script. You'll see, they are equivalent to those in the C++ demos.
#!/usr/bin/env python
# Software License Agreement (BSD License)
#
# Copyright (c) 2012, Philipp Wagner
# All rights reserved.
#
# Redistribution and use in source and binary forms, with or without
# modification, are permitted provided that the following conditions
# are met:
#
#  * Redistributions of source code must retain the above copyright
#    notice, this list of conditions and the following disclaimer.
#  * Redistributions in binary form must reproduce the above
#    copyright notice, this list of conditions and the following
#    disclaimer in the documentation and/or other materials provided
#    with the distribution.
#  * Neither the name of the author nor the names of its
#    contributors may be used to endorse or promote products derived
#    from this software without specific prior written permission.
#
# THIS SOFTWARE IS PROVIDED BY THE COPYRIGHT HOLDERS AND CONTRIBUTORS
# "AS IS" AND ANY EXPRESS OR IMPLIED WARRANTIES, INCLUDING, BUT NOT
# LIMITED TO, THE IMPLIED WARRANTIES OF MERCHANTABILITY AND FITNESS
# FOR A PARTICULAR PURPOSE ARE DISCLAIMED. IN NO EVENT SHALL THE
# COPYRIGHT OWNER OR CONTRIBUTORS BE LIABLE FOR ANY DIRECT, INDIRECT,
# INCIDENTAL, SPECIAL, EXEMPLARY, OR CONSEQUENTIAL DAMAGES (INCLUDING,
# BUT NOT LIMITED TO, PROCUREMENT OF SUBSTITUTE GOODS OR SERVICES;
# LOSS OF USE, DATA, OR PROFITS; OR BUSINESS INTERRUPTION) HOWEVER
# CAUSED AND ON ANY THEORY OF LIABILITY, WHETHER IN CONTRACT, STRICT
# LIABILITY, OR TORT (INCLUDING NEGLIGENCE OR OTHERWISE) ARISING IN
# ANY WAY OUT OF THE USE OF THIS SOFTWARE, EVEN IF ADVISED OF THE
# POSSIBILITY OF SUCH DAMAGE.


import os
import sys
 import PIL.Image as Image

cv2
import numpy as np

import matplotlib.pyplot as plt
import matplotlib.cm as cm

import cv2

def normalize(X, low, high, dtype=None):
    """Normalizes a given array in X to a value between low and high."""
    X = np.asarray(X)
    minX, maxX = np.min(X), np.max(X)
    # normalize to [0...1].
    X = X - float(minX)
    X = X / float((maxX - minX))
    # scale to [low...high].
    X = X * (high-low)
    X = X + low
    if dtype is None:
        return np.asarray(X)
    return np.asarray(X, dtype=dtype)

def read_images(path, sz=None):
    """Reads the images in a given folder, resizes images on the fly if size is given.

    Args:
        path: Path to a folder with subfolders representing the subjects (persons).
        sz: A tuple with the size Resizes

    Returns:
        A list [X,y]

            X: The images, which is a Python list of numpy arrays.
            y: The corresponding labels (the unique number of the subject, person) in a Python list.
    """
    c = 0
    X,y = [], []
    for dirname, dirnames, filenames in os.walk(path):
        for subdirname in dirnames:
            subject_path = os.path.join(dirname, subdirname)
            for filename in os.listdir(subject_path):
                try:
                    im = Image.open(os.path.join(subject_path, filename))
                    im = im.convert("L")
cv2.imread(os.path.join(subject_path, filename), cv2.IMREAD_GRAYSCALE)
                    # resize to given size (if given)
                    if (sz is not None):
                        im = im.resize(sz, Image.ANTIALIAS)
cv2.resize(im, sz)
                    X.append(np.asarray(im, dtype=np.uint8))
                    y.append(c)
                except IOError, (errno, strerror):
                    print "I/O error({0}): {1}".format(errno, strerror)
                except:
                    print "Unexpected error:", sys.exc_info()[0]
                    raise
            c = c+1
    return [X,y]

def create_font(fontname='Tahoma', fontsize=10):
    """Creates a font for the subplot."""
    return { 'fontname': fontname, 'fontsize':fontsize }

def subplot(title, images, rows, cols, sptitle="subplot", sptitles=[], colormap=cm.gray, ticks_visible=True, filename=None):
    """This will ease creating a subplot with matplotlib a lot for us."""
    fig = plt.figure()
    # main title
    fig.text(.5, .95, title, horizontalalignment='center')
    for i in xrange(len(images)):
        ax0 = fig.add_subplot(rows,cols,(i+1))
        plt.setp(ax0.get_xticklabels(), visible=False)
        plt.setp(ax0.get_yticklabels(), visible=False)
        if len(sptitles) == len(images):
            plt.title("%s #%s" % (sptitle, str(sptitles[i])), create_font('Tahoma',10))
        else:
            plt.title("%s #%d" % (sptitle, (i+1)), create_font('Tahoma',10))
        plt.imshow(np.asarray(images[i]), cmap=colormap)
    if filename is None:
        plt.show()
    else:
        fig.savefig(filename)

def imsave(image, title="", filename=None):
    """Saves or shows (if no filename is given) an image."""
    fig = plt.figure()
    plt.imshow(np.asarray(image))
    plt.title(title, create_font('Tahoma',10))
    if filename is None:
        plt.show()
    else:
        fig.savefig(filename)

if __name__ == "__main__":
    # This is where we write the images, if an output_dir is given
    # in command line:
    out_dir = None
    # You'll need at least a path to your image data, please see
    # the tutorial coming with this source code on how to prepare
    # your image data:
    if len(sys.argv) != < 2:
        print "USAGE: facerec_demo.py </path/to/images>"
</path/to/images> [</path/to/store/images/at>]"
        sys.exit()
    # Now read in the image data. This must be a valid path!
    [X,y] = read_images(sys.argv[1])
    if len(sys.argv) == 3:
        out_dir = sys.argv[2]
    # Create the Eigenfaces model. We are going to use the default
    # parameters for this simple example, please read the documentation
    # for thresholding:
    model = cv2.createEigenFaceRecognizer()
    # Read
    # Learn the model. Remember our function returns Python lists,
    # so we use np.asarray to turn them into NumPy lists to make
    # the OpenCV wrapper happy:
    model.train(np.asarray(X), np.asarray(y))
    # We now get a prediction from the model! In reality you
    # should always use unseen images for testing your model.
    # But so many people were confused, when I sliced an image
    # off in the C++ version, so I am just using an image we
    # have trained with.
    #
    # model.predict is going to return the predicted label and
    # the associated confidence:
    [p_label, p_confidence] = model.predict(np.asarray(X[0]))
    # Print it:
    print "Predicted label = %d (confidence=%.2f)" % (p_label, p_confidence)
    # Cool! Finally we'll plot the Eigenfaces, because that's
    # what most people read in the papers are keen to see.
    #
    # Just like in C++ you have access to all model internal
    # data, because the cv::FaceRecognizer is a cv::Algorithm.
    #
    # You can see the available parameters with getParams():
    print model.getParams()
    # Now let's get some data:
    mean = model.getMat("mean")
    eigenvectors = model.getMat("eigenvectors")
    cv2.imwrite("test.png", X[0])
    # We'll save the mean, by first normalizing it:
    mean_norm = normalize(mean, 0, 255)
    mean_resized = mean_norm.reshape(X[0].shape)
    imsave(mean_resized, "Mean Face", "mean.png")
if out_dir is None:
        cv2.imshow("mean", np.asarray(mean_resized, dtype=np.uint8))
    else:
        cv2.imwrite("%s/mean.png" % (out_dir), np.asarray(mean_resized, dtype=np.uint8))
    # Turn the first (at most) 16 eigenvectors into grayscale
    # images. You could also use cv::normalize here, but sticking
    # to NumPy is much easier for now.
    # Note: eigenvectors are stored by column:
    SubplotData = []
    for i in xrange(min(len(X), 16)):
        eigenvector_i = eigenvectors[:,i].reshape(X[0].shape)
        SubplotData.append(normalize(eigenvector_i, eigenvector_i_norm = normalize(eigenvector_i, 0, 255))
    # Plot them and store the plot to "python_eigenfaces.png"
    subplot(title="Eigenfaces AT&T Facedatabase", images=SubplotData, rows=4, cols=4, sptitle="Eigenface", colormap=cm.jet, filename="eigenfaces.png")
255)
        # Show or save the images:
        if out_dir is None:
            cv2.imshow("%s/eigenvector_%d" % (out_dir,i), np.asarray(eigenvector_i_norm, dtype=np.uint8))
        else:
            cv2.imwrite("%s/eigenvector_%d.png" % (out_dir,i), np.asarray(eigenvector_i_norm, dtype=np.uint8))
    # Show the images:
    if out_dir is None:
        cv2.waitKey(0)
| | 7 | Shortened code. Final version. |
The Python wrapper for cv::FaceRecognizer works now. First of all thanks to Eric Christiansen for writing the Python wrapper for the contrib module in the first place! Then with some help from Vadim Pisarevsky, it was an easy fix (I needed to change 1! parameter). So if you update and compile your git repository it's supposed to work.
The example in this tutorial is going to show how to work with the Eigenfaces model in OpenCV's Python wrapper. You are going to learn how to train a FaceRecognizer on your data, get a prediction (with associated confidence) from the model and see how to access the model internal data. You'll also see how to plot the Eigenfaces, because it's what most of the people want to see.
You'll find the demo in samples/python2 folder:
I'll add this tutorial to the official documentation, as soon as my job allows. Feel free to comment if you have questions or any other requests.
We aren't doing a toy example, so you'll need some image data. For sake of simplicity I have assumed, that the images (the faces, persons you want to recognize) are given in folders. So imagine I have a folder (a dataset) images, with the subfolders person1, person2 and so on:
philipp@mango:~/facerec/data/images$ tree -L 2 | head -n 20
.
|-- person1
|   |-- 1.jpg
|   |-- 2.jpg
|   |-- 3.jpg
|   |-- 4.jpg
|-- person2
|   |-- 1.jpg
|   |-- 2.jpg
|   |-- 3.jpg
|   |-- 4.jpg

[...]
One of the public available datasets, that is already coming in such a folder structure is the AT&T Facedatabase, available at:
Once unpacked it is going to look like this (on my filesystem it is unpacked to /home/philipp/facerec/data/at/, your path is different!):
philipp@mango:~/facerec/data/at$ tree .
.
|-- README
|-- s1
|   |-- 1.pgm
|   |-- 2.pgm
[...]
|   `-- 10.pgm
|-- s2
|   |-- 1.pgm
|   |-- 2.pgm
[...]
|   `-- 10.pgm
|-- s3
|   |-- 1.pgm
|   |-- 2.pgm
[...]
|   `-- 10.pgm

...

40 directories, 401 files
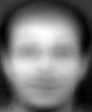
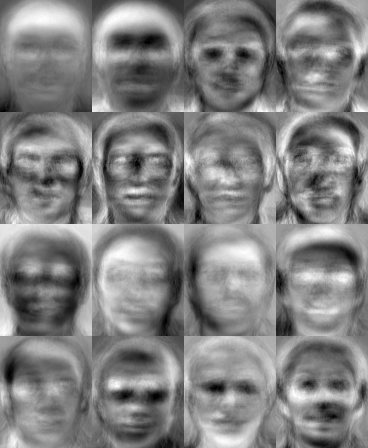
I am going to use some functions from my Guide To Face Recognition with Python. These functions will make it much easier to work with the image data, like reading the folder hierarchie. The script outputs a prediction, the names of available model data, the mean face and the first (at most) 16 eigenfaces:
You can either show the results or save them to disk. Run the application with:
python facerec_demo.py </path/to/your/images/> [</path/to/store/results/at>]
So if I have extracted the AT&T Facedatabase to /home/philipp/facerec/data/at and I want to show the results I call it like this:
python facerec_demo.py /home/philipp/facerec/data/at
If I have extracted the AT&T Facedatabase to /home/philipp/facerec/data/at and I want to save the results to /home/philipp/out_dir I call it like this:
python facerec_demo.py /home/philipp/facerec/data/at /home/philipp/out_dir
First of all I'll show the full sourcecode listing of facerec_demo.py and then the eigenfaces generated by the script. You'll see, they are equivalent to those in the C++ demos.
#!/usr/bin/env python
# Software License Agreement (BSD License)
#
# Copyright (c) 2012, Philipp Wagner
# All rights reserved.
#
# Redistribution and use in source and binary forms, with or without
# modification, are permitted provided that the following conditions
# are met:
#
#  * Redistributions of source code must retain the above copyright
#    notice, this list of conditions and the following disclaimer.
#  * Redistributions in binary form must reproduce the above
#    copyright notice, this list of conditions and the following
#    disclaimer in the documentation and/or other materials provided
#    with the distribution.
#  * Neither the name of the author nor the names of its
#    contributors may be used to endorse or promote products derived
#    from this software without specific prior written permission.
#
# THIS SOFTWARE IS PROVIDED BY THE COPYRIGHT HOLDERS AND CONTRIBUTORS
# "AS IS" AND ANY EXPRESS OR IMPLIED WARRANTIES, INCLUDING, BUT NOT
# LIMITED TO, THE IMPLIED WARRANTIES OF MERCHANTABILITY AND FITNESS
# FOR A PARTICULAR PURPOSE ARE DISCLAIMED. IN NO EVENT SHALL THE
# COPYRIGHT OWNER OR CONTRIBUTORS BE LIABLE FOR ANY DIRECT, INDIRECT,
# INCIDENTAL, SPECIAL, EXEMPLARY, OR CONSEQUENTIAL DAMAGES (INCLUDING,
# BUT NOT LIMITED TO, PROCUREMENT OF SUBSTITUTE GOODS OR SERVICES;
# LOSS OF USE, DATA, OR PROFITS; OR BUSINESS INTERRUPTION) HOWEVER
# CAUSED AND ON ANY THEORY OF LIABILITY, WHETHER IN CONTRACT, STRICT
# LIABILITY, OR TORT (INCLUDING NEGLIGENCE OR OTHERWISE) ARISING IN
# ANY WAY OUT OF THE USE OF THIS SOFTWARE, EVEN IF ADVISED OF THE
# POSSIBILITY OF SUCH DAMAGE.


import os
import sys
import cv2
import numpy as np

def normalize(X, low, high, dtype=None):
    """Normalizes a given array in X to a value between low and high."""
    X = np.asarray(X)
    minX, maxX = np.min(X), np.max(X)
    # normalize to [0...1].
    X = X - float(minX)
    X = X / float((maxX - minX))
    # scale to [low...high].
    X = X * (high-low)
    X = X + low
    if dtype is None:
        return np.asarray(X)
    return np.asarray(X, dtype=dtype)


def read_images(path, sz=None):
    """Reads the images in a given folder, resizes images on the fly if size is given.

    Args:
        path: Path to a folder with subfolders representing the subjects (persons).
        sz: A tuple with the size Resizes

    Returns:
        A list [X,y]

            X: The images, which is a Python list of numpy arrays.
            y: The corresponding labels (the unique number of the subject, person) in a Python list.
    """
    c = 0
    X,y = [], []
    for dirname, dirnames, filenames in os.walk(path):
        for subdirname in dirnames:
            subject_path = os.path.join(dirname, subdirname)
            for filename in os.listdir(subject_path):
                try:
                    im = cv2.imread(os.path.join(subject_path, filename), cv2.IMREAD_GRAYSCALE)
                    # resize to given size (if given)
                    if (sz is not None):
                        im = cv2.resize(im, sz)
                    X.append(np.asarray(im, dtype=np.uint8))
                    y.append(c)
                except IOError, (errno, strerror):
                    print "I/O error({0}): {1}".format(errno, strerror)
                except:
                    print "Unexpected error:", sys.exc_info()[0]
                    raise
            c = c+1
    return [X,y]

if __name__ == "__main__":
    # This is where we write the images, if an output_dir is given
    # in command line:
    out_dir = None
    # You'll need at least a path to your image data, please see
    # the tutorial coming with this source code on how to prepare
    # your image data:
    if len(sys.argv) < 2:
        print "USAGE: facerec_demo.py </path/to/images> [</path/to/store/images/at>]"
        sys.exit()
    # Now read in the image data. This must be a valid path!
    [X,y] = read_images(sys.argv[1])
    if len(sys.argv) == 3:
        out_dir = sys.argv[2]
    # Create the Eigenfaces model. We are going to use the default
    # parameters for this simple example, please read the documentation
    # for thresholding:
    model = cv2.createEigenFaceRecognizer()
    # Read
    # Learn the model. Remember our function returns Python lists,
    # so we use np.asarray to turn them into NumPy lists to make
    # the OpenCV wrapper happy:
    model.train(np.asarray(X), np.asarray(y))
    # We now get a prediction from the model! In reality you
    # should always use unseen images for testing your model.
    # But so many people were confused, when I sliced an image
    # off in the C++ version, so I am just using an image we
    # have trained with.
    #
    # model.predict is going to return the predicted label and
    # the associated confidence:
    [p_label, p_confidence] = model.predict(np.asarray(X[0]))
    # Print it:
    print "Predicted label = %d (confidence=%.2f)" % (p_label, p_confidence)
    # Cool! Finally we'll plot the Eigenfaces, because that's
    # what most people read in the papers are keen to see.
    #
    # Just like in C++ you have access to all model internal
    # data, because the cv::FaceRecognizer is a cv::Algorithm.
    #
    # You can see the available parameters with getParams():
    print model.getParams()
    # Now let's get some data:
    mean = model.getMat("mean")
    eigenvectors = model.getMat("eigenvectors")
    cv2.imwrite("test.png", X[0])
    # We'll save the mean, by first normalizing it:
    mean_norm = normalize(mean, 0, 255)
255, dtype=np.uint8)
    mean_resized = mean_norm.reshape(X[0].shape)
    if out_dir is None:
        cv2.imshow("mean", np.asarray(mean_resized, dtype=np.uint8))
mean_resized)
    else:
        cv2.imwrite("%s/mean.png" % (out_dir), np.asarray(mean_resized, dtype=np.uint8))
mean_resized)
    # Turn the first (at most) 16 eigenvectors into grayscale
    # images. You could also use cv::normalize here, but sticking
    # to NumPy is much easier for now.
    # Note: eigenvectors are stored by column:
    for i in xrange(min(len(X), 16)):
        eigenvector_i = eigenvectors[:,i].reshape(X[0].shape)
        eigenvector_i_norm = normalize(eigenvector_i, 0, 255)
255, dtype=np.uint8)
        # Show or save the images:
        if out_dir is None:
            cv2.imshow("%s/eigenvector_%d" cv2.imshow("%s/eigenface_%d" % (out_dir,i), np.asarray(eigenvector_i_norm, dtype=np.uint8))
eigenvector_i_norm)
        else:
            cv2.imwrite("%s/eigenvector_%d.png" cv2.imwrite("%s/eigenface_%d.png" % (out_dir,i), np.asarray(eigenvector_i_norm, dtype=np.uint8))
eigenvector_i_norm)
    # Show the images:
    if out_dir is None:
        cv2.waitKey(0)
| | 8 | No.8 Revision |
The Python wrapper for cv::FaceRecognizer works now. First of all thanks to Vadim and Eric ChristiansenEric for writing the Python wrapper for the contrib module in the first place! Then with some help from Vadim PisarevskyVadim, it was an easy fix (I needed to change 1! parameter). So if you update and compile your git repository it's supposed to work.
The example in this tutorial is going to show how to work with the Eigenfaces model in OpenCV's Python wrapper. You are going to learn how to train a FaceRecognizer on your data, get a prediction (with associated confidence) from the model and see how to access the model internal data. You'll also see how to plot the Eigenfaces, because it's what most of the people want to see.
You'll find the demo in samples/python2 folder:
I'll add this tutorial to the official documentation, as soon as my job allows. Feel free to comment if you have questions or any other requests.
We aren't doing a toy example, so you'll need some image data. For sake of simplicity I have assumed, that the images (the faces, persons you want to recognize) are given in folders. So imagine I have a folder (a dataset) images, with the subfolders person1, person2 and so on:
philipp@mango:~/facerec/data/images$ tree -L 2 | head -n 20
.
|-- person1
|   |-- 1.jpg
|   |-- 2.jpg
|   |-- 3.jpg
|   |-- 4.jpg
|-- person2
|   |-- 1.jpg
|   |-- 2.jpg
|   |-- 3.jpg
|   |-- 4.jpg

[...]
One of the public available datasets, that is already coming in such a folder structure is the AT&T Facedatabase, available at:
Once unpacked it is going to look like this (on my filesystem it is unpacked to /home/philipp/facerec/data/at/, your path is different!):
philipp@mango:~/facerec/data/at$ tree .
.
|-- README
|-- s1
|   |-- 1.pgm
|   |-- 2.pgm
[...]
|   `-- 10.pgm
|-- s2
|   |-- 1.pgm
|   |-- 2.pgm
[...]
|   `-- 10.pgm
|-- s3
|   |-- 1.pgm
|   |-- 2.pgm
[...]
|   `-- 10.pgm

...

40 directories, 401 files
I am going to use some functions from my Guide To Face Recognition with Python. These functions will make it much easier to work with the image data, like reading the folder hierarchie. The script outputs a prediction, the names of available model data, the mean face and the first (at most) 16 eigenfaces:
You can either show the results or save them to disk. Run the application with:
python facerec_demo.py </path/to/your/images/> [</path/to/store/results/at>]
So if I have extracted the AT&T Facedatabase to /home/philipp/facerec/data/at and I want to show the results I call it like this:
python facerec_demo.py /home/philipp/facerec/data/at
If I have extracted the AT&T Facedatabase to /home/philipp/facerec/data/at and I want to save the results to /home/philipp/out_dir I call it like this:
python facerec_demo.py /home/philipp/facerec/data/at /home/philipp/out_dir
First of all I'll show the full sourcecode listing of facerec_demo.py and then the eigenfaces generated by the script. You'll see, they are equivalent to those in the C++ demos.
#!/usr/bin/env python
# Software License Agreement (BSD License)
#
# Copyright (c) 2012, Philipp Wagner
# All rights reserved.
#
# Redistribution and use in source and binary forms, with or without
# modification, are permitted provided that the following conditions
# are met:
#
#  * Redistributions of source code must retain the above copyright
#    notice, this list of conditions and the following disclaimer.
#  * Redistributions in binary form must reproduce the above
#    copyright notice, this list of conditions and the following
#    disclaimer in the documentation and/or other materials provided
#    with the distribution.
#  * Neither the name of the author nor the names of its
#    contributors may be used to endorse or promote products derived
#    from this software without specific prior written permission.
#
# THIS SOFTWARE IS PROVIDED BY THE COPYRIGHT HOLDERS AND CONTRIBUTORS
# "AS IS" AND ANY EXPRESS OR IMPLIED WARRANTIES, INCLUDING, BUT NOT
# LIMITED TO, THE IMPLIED WARRANTIES OF MERCHANTABILITY AND FITNESS
# FOR A PARTICULAR PURPOSE ARE DISCLAIMED. IN NO EVENT SHALL THE
# COPYRIGHT OWNER OR CONTRIBUTORS BE LIABLE FOR ANY DIRECT, INDIRECT,
# INCIDENTAL, SPECIAL, EXEMPLARY, OR CONSEQUENTIAL DAMAGES (INCLUDING,
# BUT NOT LIMITED TO, PROCUREMENT OF SUBSTITUTE GOODS OR SERVICES;
# LOSS OF USE, DATA, OR PROFITS; OR BUSINESS INTERRUPTION) HOWEVER
# CAUSED AND ON ANY THEORY OF LIABILITY, WHETHER IN CONTRACT, STRICT
# LIABILITY, OR TORT (INCLUDING NEGLIGENCE OR OTHERWISE) ARISING IN
# ANY WAY OUT OF THE USE OF THIS SOFTWARE, EVEN IF ADVISED OF THE
# POSSIBILITY OF SUCH DAMAGE.


import os
import sys
import cv2
import numpy as np

def normalize(X, low, high, dtype=None):
    """Normalizes a given array in X to a value between low and high."""
    X = np.asarray(X)
    minX, maxX = np.min(X), np.max(X)
    # normalize to [0...1].
    X = X - float(minX)
    X = X / float((maxX - minX))
    # scale to [low...high].
    X = X * (high-low)
    X = X + low
    if dtype is None:
        return np.asarray(X)
    return np.asarray(X, dtype=dtype)


def read_images(path, sz=None):
    """Reads the images in a given folder, resizes images on the fly if size is given.

    Args:
        path: Path to a folder with subfolders representing the subjects (persons).
        sz: A tuple with the size Resizes

    Returns:
        A list [X,y]

            X: The images, which is a Python list of numpy arrays.
            y: The corresponding labels (the unique number of the subject, person) in a Python list.
    """
    c = 0
    X,y = [], []
    for dirname, dirnames, filenames in os.walk(path):
        for subdirname in dirnames:
            subject_path = os.path.join(dirname, subdirname)
            for filename in os.listdir(subject_path):
                try:
                    im = cv2.imread(os.path.join(subject_path, filename), cv2.IMREAD_GRAYSCALE)
                    # resize to given size (if given)
                    if (sz is not None):
                        im = cv2.resize(im, sz)
                    X.append(np.asarray(im, dtype=np.uint8))
                    y.append(c)
                except IOError, (errno, strerror):
                    print "I/O error({0}): {1}".format(errno, strerror)
                except:
                    print "Unexpected error:", sys.exc_info()[0]
                    raise
            c = c+1
    return [X,y]

if __name__ == "__main__":
    # This is where we write the images, if an output_dir is given
    # in command line:
    out_dir = None
    # You'll need at least a path to your image data, please see
    # the tutorial coming with this source code on how to prepare
    # your image data:
    if len(sys.argv) < 2:
        print "USAGE: facerec_demo.py </path/to/images> [</path/to/store/images/at>]"
        sys.exit()
    # Now read in the image data. This must be a valid path!
    [X,y] = read_images(sys.argv[1])
    if len(sys.argv) == 3:
        out_dir = sys.argv[2]
    # Create the Eigenfaces model. We are going to use the default
    # parameters for this simple example, please read the documentation
    # for thresholding:
    model = cv2.createEigenFaceRecognizer()
    # Read
    # Learn the model. Remember our function returns Python lists,
    # so we use np.asarray to turn them into NumPy lists to make
    # the OpenCV wrapper happy:
    model.train(np.asarray(X), np.asarray(y))
    # We now get a prediction from the model! In reality you
    # should always use unseen images for testing your model.
    # But so many people were confused, when I sliced an image
    # off in the C++ version, so I am just using an image we
    # have trained with.
    #
    # model.predict is going to return the predicted label and
    # the associated confidence:
    [p_label, p_confidence] = model.predict(np.asarray(X[0]))
    # Print it:
    print "Predicted label = %d (confidence=%.2f)" % (p_label, p_confidence)
    # Cool! Finally we'll plot the Eigenfaces, because that's
    # what most people read in the papers are keen to see.
    #
    # Just like in C++ you have access to all model internal
    # data, because the cv::FaceRecognizer is a cv::Algorithm.
    #
    # You can see the available parameters with getParams():
    print model.getParams()
    # Now let's get some data:
    mean = model.getMat("mean")
    eigenvectors = model.getMat("eigenvectors")
    cv2.imwrite("test.png", X[0])
    # We'll save the mean, by first normalizing it:
    mean_norm = normalize(mean, 0, 255, dtype=np.uint8)
    mean_resized = mean_norm.reshape(X[0].shape)
    if out_dir is None:
        cv2.imshow("mean", mean_resized)
    else:
        cv2.imwrite("%s/mean.png" % (out_dir), mean_resized)
    # Turn the first (at most) 16 eigenvectors into grayscale
    # images. You could also use cv::normalize here, but sticking
    # to NumPy is much easier for now.
    # Note: eigenvectors are stored by column:
    for i in xrange(min(len(X), 16)):
        eigenvector_i = eigenvectors[:,i].reshape(X[0].shape)
        eigenvector_i_norm = normalize(eigenvector_i, 0, 255, dtype=np.uint8)
        # Show or save the images:
        if out_dir is None:
            cv2.imshow("%s/eigenface_%d" % (out_dir,i), eigenvector_i_norm)
        else:
            cv2.imwrite("%s/eigenface_%d.png" % (out_dir,i), eigenvector_i_norm)
    # Show the images:
    if out_dir is None:
        cv2.waitKey(0)
| | 9 | Added the link to the script, so it should include all possible bugfixes. |
The Python wrapper for cv::FaceRecognizer works now. First of all thanks to Vadim and Eric for writing the Python wrapper for the contrib module in the first place! Then with some help from Vadim, it was an easy fix (I needed to change 1! parameter). So if you update and compile your git repository it's supposed to work.
The example in this tutorial is going to show how to work with the Eigenfaces model in OpenCV's Python wrapper. You are going to learn how to train a FaceRecognizer on your data, get a prediction (with associated confidence) from the model and see how to access the model internal data. You'll also see how to plot the Eigenfaces, because it's what most of the people want to see.
You'll find the demo in samples/python2 folder:
I'll add this tutorial to the official documentation, as soon as my job allows. Feel free to comment if you have questions or any other requests.
We aren't doing a toy example, so you'll need some image data. For sake of simplicity I have assumed, that the images (the faces, persons you want to recognize) are given in folders. So imagine I have a folder (a dataset) images, with the subfolders person1, person2 and so on:
philipp@mango:~/facerec/data/images$ tree -L 2 | head -n 20
.
|-- person1
|   |-- 1.jpg
|   |-- 2.jpg
|   |-- 3.jpg
|   |-- 4.jpg
|-- person2
|   |-- 1.jpg
|   |-- 2.jpg
|   |-- 3.jpg
|   |-- 4.jpg

[...]
One of the public available datasets, that is already coming in such a folder structure is the AT&T Facedatabase, available at:
Once unpacked it is going to look like this (on my filesystem it is unpacked to /home/philipp/facerec/data/at/, your path is different!):
philipp@mango:~/facerec/data/at$ tree .
.
|-- README
|-- s1
|   |-- 1.pgm
|   |-- 2.pgm
[...]
|   `-- 10.pgm
|-- s2
|   |-- 1.pgm
|   |-- 2.pgm
[...]
|   `-- 10.pgm
|-- s3
|   |-- 1.pgm
|   |-- 2.pgm
[...]
|   `-- 10.pgm

...

40 directories, 401 files
I am going to use some functions from my Guide To Face Recognition with Python. These functions will make it much easier to work with the image data, like reading the folder hierarchie. The script outputs a prediction, the names of available model data, the mean face and the first (at most) 16 eigenfaces:
You can either show the results or save them to disk. Run the application with:
python facerec_demo.py </path/to/your/images/> [</path/to/store/results/at>]
So if I have extracted the AT&T Facedatabase to /home/philipp/facerec/data/at and I want to show the results I call it like this:
python facerec_demo.py /home/philipp/facerec/data/at
If I have extracted the AT&T Facedatabase to /home/philipp/facerec/data/at and I want to save the results to /home/philipp/out_dir I call it like this:
python facerec_demo.py /home/philipp/facerec/data/at /home/philipp/out_dir
First of all I'll show the full sourcecode listing of facerec_demo.py and then the eigenfaces generated by the script. You'll see, they are equivalent to those in the C++ demos.
#!/usr/bin/env python
# Software License Agreement (BSD License)
#
# Copyright (c) 2012, Philipp Wagner
# All rights reserved.
#
# Redistribution and use in source and binary forms, with or without
# modification, are permitted provided that the following conditions
# are met:
#
#  * Redistributions of source code must retain the above copyright
#    notice, this list of conditions and the following disclaimer.
#  * Redistributions in binary form must reproduce the above
#    copyright notice, this list of conditions and the following
#    disclaimer in the documentation and/or other materials provided
#    with the distribution.
#  * Neither the name of the author nor the names of its
#    contributors may be used to endorse or promote products derived
#    from this software without specific prior written permission.
#
# THIS SOFTWARE IS PROVIDED BY THE COPYRIGHT HOLDERS AND CONTRIBUTORS
# "AS IS" AND ANY EXPRESS OR IMPLIED WARRANTIES, INCLUDING, BUT NOT
# LIMITED TO, THE IMPLIED WARRANTIES OF MERCHANTABILITY AND FITNESS
# FOR A PARTICULAR PURPOSE ARE DISCLAIMED. IN NO EVENT SHALL THE
# COPYRIGHT OWNER OR CONTRIBUTORS BE LIABLE FOR ANY DIRECT, INDIRECT,
# INCIDENTAL, SPECIAL, EXEMPLARY, OR CONSEQUENTIAL DAMAGES (INCLUDING,
# BUT NOT LIMITED TO, PROCUREMENT OF SUBSTITUTE GOODS OR SERVICES;
# LOSS OF USE, DATA, OR PROFITS; OR BUSINESS INTERRUPTION) HOWEVER
# CAUSED AND ON ANY THEORY OF LIABILITY, WHETHER IN CONTRACT, STRICT
# LIABILITY, OR TORT (INCLUDING NEGLIGENCE OR OTHERWISE) ARISING IN
# ANY WAY OUT OF THE USE OF THIS SOFTWARE, EVEN IF ADVISED OF THE
# POSSIBILITY OF SUCH DAMAGE.


import os
import sys
import cv2
import numpy as np

def normalize(X, low, high, dtype=None):
    """Normalizes a given array in X to a value between low and high."""
    X = np.asarray(X)
    minX, maxX = np.min(X), np.max(X)
    # normalize to [0...1].
    X = X - float(minX)
    X = X / float((maxX - minX))
    # scale to [low...high].
    X = X * (high-low)
    X = X + low
    if dtype
The facerec_demo.py script
samples/python2/facerec_demo.py ):
