This forum is disabled, please visit https://forum.opencv.org
| | 1 | initial version |
STEP 1 : MAKE SURE YOUR CMAKE KNOWS YOUR COMPILER LOCATION
DO NOT FORGET TO STARTUP CMAKE WITH ADMIN SUPPORT/RIGHTS, ELSE THE TOOL CANNOT RETRIEVE ALL NEEDED DETAILS
Configure your folders for source and output first and do not to forget to select both the grouping and advanced option. Testing learned me that it is better to use the master branch source code for this, by retrieving it with GIT like in this guide. I could not get it to work with the downloadable data for version 2.4.5.
When hitting configure for the first time, select Visual Studio 10 WIN64, but manually select your compilers, NOT automatically. Then go to your Visual Studio installation folder and look for VC/bin/cl.exe. Add this for both C and C++ compiler. It takes me further down the CMAKE process now, giving me the ability to configure all add-on libraries.
Hit configure and fill in the desired target system and compilers! Be sure to manually set the compilers for compilation.
STEP 2 : SET ALL CONFIGURATIONS
My tip is to build only what you actually need. If you do not need documentation, then do not select the with option. Attached here is the configuration I used, resulting in a succesful manually build.
Hitting the above configurations helps to get to a configuration that can be adapted, like seen here. Go over each option and fill in all the options that you require:
Be prepared to get returned multiple red lines after a new configuration hit. It will keep asking for more parameters if you for example select the TBB optionality.
When all red lines are removed, hit the generate button which will creare the solution, which is building on my system now. Will report back if it was successful.
My configuration : CLICK HERE
STEP 3 : GENERATE CODE AND MOVE TO VISUAL STUDIO
Let CMAKE generate a solution file, open it in Visual Studio and start building. First for debug, then for release, if both are needed.
Some tips while building:
Finally your destination folder will have a lib and bin folder containing all files needed for programming.
GOOD LUCK! Feel free to ask questions.
| | 2 | No.2 Revision |
STEP 1 : MAKE SURE YOUR CMAKE KNOWS YOUR COMPILER LOCATION
DO NOT FORGET TO STARTUP CMAKE WITH ADMIN SUPPORT/RIGHTS, ELSE THE TOOL CANNOT RETRIEVE ALL NEEDED DETAILS
Configure your folders for source and output first and do not to forget to select both the grouping and advanced option. Testing learned me that it is better to use the master branch source code for this, master from the GIT repository, by retrieving it with GIT like in this guide. I It has all latest fixes compared to the prebuilt installation packs.
There are two options
- Use the master branch, however this is for development, so code could not get it to work with the downloadable data for version 2.4.5.be unstable.
- Use the 2.4 stable branch, which you can specify in your TortoiseGIT configuration window.
When hitting configure for the first time, select Visual Studio 10 WIN64, but manually select your compilers, NOT automatically. Then go to your Visual Studio installation folder and look for VC/bin/cl.exe. Add this for both C and C++ compiler. It takes me further down the CMAKE process now, giving me the ability to configure all add-on libraries.
Hit configure and fill in the desired target system and compilers! Be sure to manually set the compilers for compilation.
STEP 2 : SET ALL CONFIGURATIONS
My tip is to build only what you actually need. If you do not need documentation, then do not select the with option. Attached here is the configuration I used, resulting in a succesful manually build.
Hitting the above configurations helps to get to a configuration that can be adapted, like seen here. Go over each option and fill in all the options that you require:
Be prepared to get returned multiple red lines after a new configuration hit. It will keep asking for more parameters if you for example select the TBB optionality.
When all red lines are removed, hit the generate button which will creare the solution, which is building on my system now. Will report back if it was successful.
My configuration : CLICK HERE
STEP 3 : GENERATE CODE AND MOVE TO VISUAL STUDIO
Let CMAKE generate a solution file, open it in Visual Studio and start building. First for debug, then for release, if both are needed.
Some tips while building:
Finally your destination folder will have a lib and bin folder containing all files needed for programming.
GOOD LUCK! Feel free to ask questions.
| | 3 | Added data link |
STEP 1 : MAKE SURE YOUR CMAKE KNOWS YOUR COMPILER LOCATION
DO NOT FORGET TO STARTUP CMAKE WITH ADMIN SUPPORT/RIGHTS, ELSE THE TOOL CANNOT RETRIEVE ALL NEEDED DETAILS
Configure your folders for source and output first and do not to forget to select both the grouping and advanced option. Testing learned me that it is better to use the source code master from the GIT repository, by retrieving it with GIT like in this guide. It has all latest fixes compared to the prebuilt installation packs.
There are two options - Use the master branch, however this is for development, so code could be unstable. - Use the 2.4 stable branch, which you can specify in your TortoiseGIT configuration window.
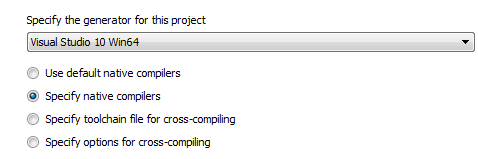
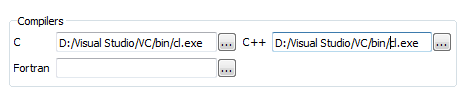
When hitting configure for the first time, select Visual Studio 10 WIN64, but manually select your compilers, NOT automatically. Then go to your Visual Studio installation folder and look for VC/bin/cl.exe. Add this for both C and C++ compiler. It takes me further down the CMAKE process now, giving me the ability to configure all add-on libraries.
Hit configure and fill in the desired target system and compilers! Be sure to manually set the compilers for compilation.
STEP 2 : SET ALL CONFIGURATIONS
My tip is to build only what you actually need. If you do not need documentation, then do not select the with option. Attached here is the configuration I used, resulting in a succesful manually build.
Hitting the above configurations helps to get to a configuration that can be adapted, like seen here. Go over each option and fill in all the options that you require:
Be prepared to get returned multiple red lines after a new configuration hit. It will keep asking for more parameters if you for example select the TBB optionality.
When all red lines are removed, hit the generate button which will creare the solution, which is building on my system now. Will report back if it was successful.
My configuration : CLICK HERE
STEP 3 : GENERATE CODE AND MOVE TO VISUAL STUDIO
Let CMAKE generate a solution file, open it in Visual Studio and start building. First for debug, then for release, if both are needed.
Some tips while building:
Finally your destination folder will have a lib and bin folder containing all files needed for programming.
GOOD LUCK! Feel free to ask questions.
FOR PEOPLE INTERESTED IN THE DLL AND LIB FILES FOR DEBUG AND RELEASE, THEY CAN BE DOWNLOADED FROM HERE:
http://www.filedropper.com/opencv245tbb4cuda5
However, they will only work with the following setup
A lot of extra stuff is left out, since I do not need it, however all basic modules in the C++ interface are included!
| | 4 | No.4 Revision |
STEP 1 : MAKE SURE YOUR CMAKE KNOWS YOUR COMPILER LOCATION
DO NOT FORGET TO STARTUP CMAKE WITH ADMIN SUPPORT/RIGHTS, ELSE THE TOOL CANNOT RETRIEVE ALL NEEDED DETAILS
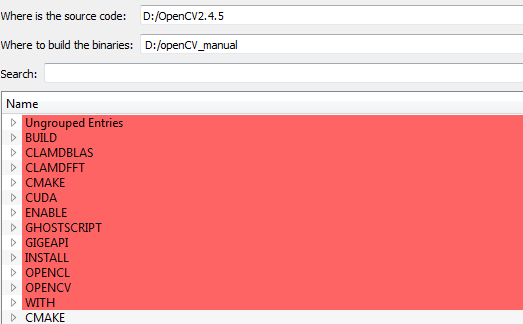
Configure your folders for source and output first and do not to forget to select both the grouping and advanced option. Testing learned me that it is better to use the source code master from the GIT repository, by retrieving it with GIT like in this guide. It has all latest fixes compared to the prebuilt installation packs.
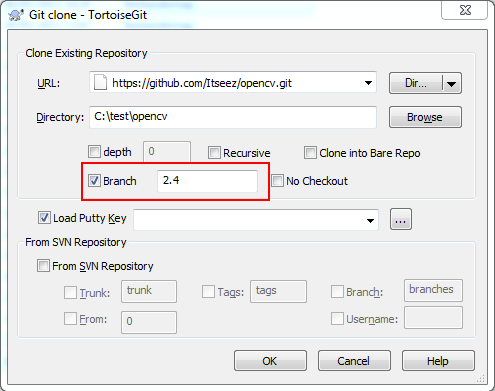
There are two options - Use the master branch, however this is for development, so code could be unstable. - Use the 2.4 stable branch, which you can specify in your TortoiseGIT configuration window.
When hitting configure for the first time, select Visual Studio 10 WIN64, but manually select your compilers, NOT automatically. Then go to your Visual Studio installation folder and look for VC/bin/cl.exe. Add this for both C and C++ compiler. It takes me further down the CMAKE process now, giving me the ability to configure all add-on libraries.
Hit configure and fill in the desired target system and compilers! Be sure to manually set the compilers for compilation.
STEP 2 : SET ALL CONFIGURATIONS
My tip is to build only what you actually need. If you do not need documentation, then do not select the with option. Attached here is the configuration I used, resulting in a succesful manually build.
Hitting the above configurations helps to get to a configuration that can be adapted, like seen here. Go over each option and fill in all the options that you require:
Be prepared to get returned multiple red lines after a new configuration hit. It will keep asking for more parameters if you for example select the TBB optionality.
When all red lines are removed, hit the generate button which will creare the solution, which is building on my system now. Will report back if it was successful.
My configuration : CLICK HERE
STEP 3 : GENERATE CODE AND MOVE TO VISUAL STUDIO
Let CMAKE generate a solution file, open it in Visual Studio and start building. First for debug, then for release, if both are needed.
Some tips while building:
Finally your destination folder will have a lib and bin folder containing all files needed for programming.
GOOD LUCK! Feel free to ask questions.
FOR PEOPLE INTERESTED IN THE DLL AND LIB FILES FOR DEBUG AND RELEASE, THEY CAN BE DOWNLOADED FROM HERE:
http://www.filedropper.com/opencv245tbb4cuda5
However, they will only work with the following setup
A lot of extra stuff is left out, since I do not need it, however all basic modules in the C++ interface are included!
