I'm having difficulties getting C++ and python rotations to match Matlab. I'm trying to get c++ to match a matlab simulation and have found the issue to be in the rotation portion. The rotation must retain all data so no clipping is allowed. So I decided to try to match Matlab rotation with Python first as it's easier to test than c++.
The python code I tried came from Flemin's Blog on rotation (http://john.freml.in/opencv-rotation) and the c++ came from Schillingman's post (https://stackoverflow.com/questions/22041699/rotate-an-image-without-cropping-in-opencv-in-c). I thought is was best to use a simple case where I set border pixel values and observe how the border rotates. Using 90 and -90 degrees simplified the transformation matrix (see https://docs.opencv.org/3.0-beta/doc/py_tutorials/py_imgproc/py_geometric_transformations/py_geometric_transformations.html)
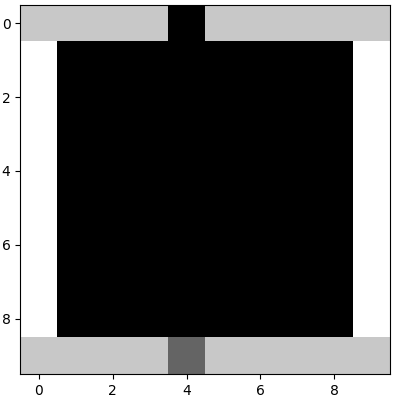
Below is a picture of the original non-rotated image in python
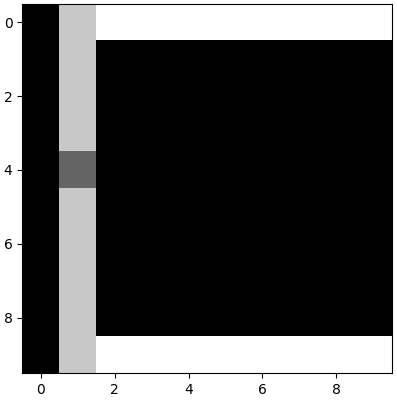
Then after running the python script (script below), I get a rotation where it is shifted to the right one column.
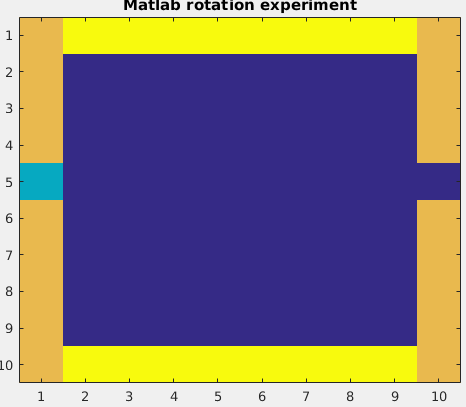
With Matlab (script below), the rotation is as expected.
Below is the Python script. I added width and height offsets to the function to allow me to experiment with offsets to the tx and ty rotation parameters. I found that setting the width offset to 1 made the 90 degree rotation case match Matlab, but it didn't help -90.
import cv2
from matplotlib import pyplot as plt
import functools
import math

bwimshow = functools.partial(plt.imshow, vmin=0, vmax=255,
                             cmap=plt.get_cmap('gray'))

def rotate_about_center(src, angle, widthOffset=0., heightOffset=0, scale=1.):
    w = src.shape[1]
    h = src.shape[0]
    offset = -0.0;
    rangle = np.deg2rad(angle)  # angle in radians
    # now calculate new image width and height
    nw = (abs(np.sin(rangle)*h) + abs(np.cos(rangle)*w))*scale
    nh = (abs(np.cos(rangle)*h) + abs(np.sin(rangle)*w))*scale
    print("nw = ", nw, "nh = ", nh)
    # ask OpenCV for the rotation matrix
    rot_mat = cv2.getRotationMatrix2D((nw*0.5 + offset, nh*0.5 + offset), angle, scale)
    # calculate the move from the old center to the new center combined
    # with the rotation
    rot_move = np.dot(rot_mat, np.array([(nw-w)*0.5 + widthOffset, (nh-h)*0.5 + heightOffset,0]))
    # the move only affects the translation, so update the translation
    # part of the transform
    rot_mat[0,2] += rot_move[0]
    rot_mat[1,2] += rot_move[1]
    return cv2.warpAffine(src, rot_mat, (int(math.ceil(nw)), int(math.ceil(nh))), flags=cv2.INTER_LANCZOS4)

def main():
    # create image
    rows = 10
    cols = 10
    angle = -90
    widthOffset = 0  # need 1 to match 90 degrees and ? for -90 degrees.
    heightOffset = 0
    img = np.zeros((rows,cols), np.float32)
    '''
    # Fill lower qtr.
    for row in range(int(rows/2), rows):
        col = row
        if col < cols:
            img[row,col] = 200
    '''
    for row in range(rows):
        img[row,0] = 255
        img[row,cols-1] = 255

    for col in range(cols):
        img[0,col] = 200
        img[rows-1,col] = 200

    img[0, int(cols/2 - 1)] = 0  # need -1 to match matlab
    img[rows-1, int(cols/2) - 1] = 100 # need -1 to match matlab
    bwimshow(img)
    plt.show()

    img = rotate_about_center(img, angle, widthOffset, heightOffset)
    print("img shape = ", img.shape)
    print('Data type', img.dtype)
    bwimshow(img)
    plt.show()
    cv2.waitKey(0)
    cv2.destroyAllWindows()


if __name__ == '__main__':
    main()enter code here
And below is the Matlab script
figure;

rows = 10;
cols = 10;
Img = zeros(rows,cols);
% draw perimeter around box
for row = 1:rows
    Img(row,1) = 255;
    Img(row,cols) = 255;
end
for col = 1:cols
    Img(1, col) = 200;
    Img(rows,col) = 200;
end
% Mark the row so we can distinguish from a column.
Img(1, cols/2) = 0;
Img(rows, cols/2) = 100;

image(Img, 'CDataMapping','scaled');
sz = size(Img);
angle = -90; % positive is counter clockwise
Img = imrotate(Img, angle, 'bilinear');
image(Img, 'CDataMapping','scaled');
sz = size(Img);
title('Matlab rotation experiment')
xlabel(['cols = ' num2str(sz(2))])
ylabel(['rows = ' num2str(sz(1))])
I apologize for the reams and reams of code, but hopefully it makes it easier for someone to replicate the problem.