Ask Your Question
0

How to connect center of detected objects/contours to form a polygon?

asked 2020-02-26 10:03:20 -0600

image description image description 
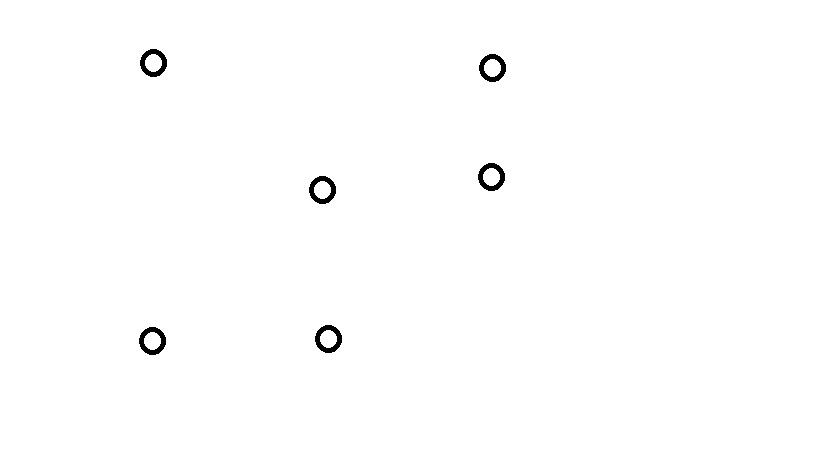
Like for example, I've detected all the objects I want to detect. I already find each of its centers. Now, I want to connect all of its center to form closed polygon. Here are the coordinates of the center of the objects: [(412, 429), (249, 418), (400, 193), (561, 181), (541, 57), (256, 50)] 
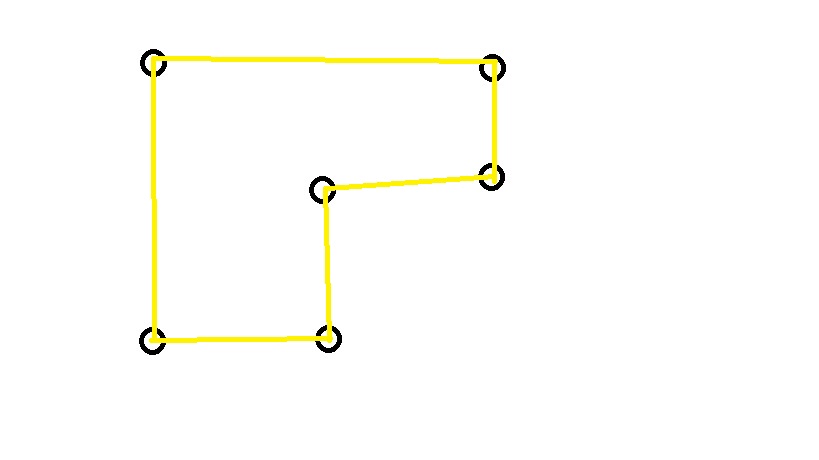
I used convexHull and drawContours, it works fine with shapes like squares and rectangles but the problem is it didn't work out like in the sample image. It just connect all the outer objects. Btw, I used python for programming language.

Here is my sample code snippet:

centers = [(412, 429), (249, 418), (400, 193), (561, 181), (541, 57), (256, 50)]

pts = cv2.convexHull(np.array(centers))

cv2.drawContours(img, [pts], 0, (0,0,0), 3)
edit retag flag offensive close merge delete

Comments

1

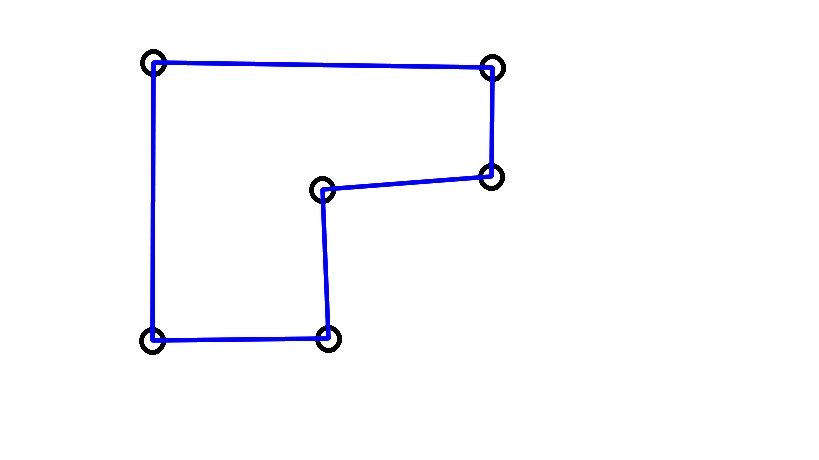
your points are NOT convex

berak gravatar imageberak ( 2020-02-27 02:02:09 -0600 )edit

2 answers

Sort by ยป oldest newest most voted
0

answered 2020-03-19 09:33:48 -0600

supra56 gravatar image

The problem have been solved. I am using Raspberry pi 4B. Using OpenCV 4.2.0. Not Opencv 3.x. Code:

#!/usr/bin/python37
#Date: 19th March, 2020
#Raspberry pi 4B, Buster, Thonny IDE 3.5, OpenCV 4.2.0

import cv2
import numpy as np

image = cv2.imread('centre.jpg')
gray = cv2.cvtColor(image, cv2.COLOR_BGR2GRAY)
blurred = cv2.GaussianBlur(gray, (5, 5), 3)
thresh = cv2.threshold(blurred, 127, 255, cv2.THRESH_BINARY)[1]

cnts = cv2.findContours(thresh.copy(), cv2.RETR_TREE,
                        cv2.CHAIN_APPROX_NONE)[0]

for c in cnts:
    # compute the center of the contour
    M = cv2.moments(c)
    cX = int(M["m10"] / M["m00"])
    cY = int(M["m01"] / M["m00"])
    # draw the contour and center of the shape on the image
    #cv2.drawContours(image, [c], -1, (0, 255, 0), 4)
    #cv2.circle(image, (cX, cY), 2, (0, 0, 255), -1)
    #cv2.line(image,(152, 340), (328, 338),(255,0,0),5)
    #cv2.line(image,(328, 338), (322, 189),(255,0,0),5)
    #cv2.line(image,(322, 189), (491, 176),(255,0,0),5)
    #cv2.line(image,(491, 176), (492,67),(255,0,0),5)
    #cv2.line(image,(492, 67), (153, 62),(255,0,0),5)
    #cv2.line(image,(153, 62), (152, 340),(255,0,0),5)

    corners = np.int32([[152, 340], [328, 338],
                        [322, 189], [491, 176],
                        [492, 67], [153, 62]])

    cv2.polylines(image, [corners], True, (255, 0, 0), 2, cv2.LINE_AA)  


# show the image
cv2.imshow("Image", image)
cv2.waitKey(0)

Output:

image description

edit flag offensive delete link more
-1

answered 2020-02-26 10:15:37 -0600

SylvainArd gravatar image

updated 2020-02-26 10:16:37 -0600

concave hulls, active contours or snakes should be a solution I think

edit flag offensive delete link more

Question Tools

1 follower

Stats

Asked: 2020-02-26 10:02:20 -0600

Seen: 1,470 times

Last updated: Mar 19 '20