Using inpaint to restore old photo
I am trying to use OpenCV's built-in "inpaint" function to restore "damaged" areas of a photo (i.e: crease). However, after using the "inpaint" function, the resulting image contains a distortion in the mask area where inpaint was applied.
From my research, I believe inpainting is used to perform photo restoration. I am not sure if the distortion is occurring because I am not using the inpaint function correctly, or if there other functions/techniques that I must utilize in addition to inpaint?
Below is a code snippet that I am using to perform the inpaint: (OpenCV for iOS)
cv::Mat result;
// Convert UIImage to MAT
cv::Mat originalImage = [source CVMat3];
cv::Mat maskImage = [mask CVGrayscaleMat];

// Grayscale the mask and threshold it
cv::Mat maskMThresh;
cv::threshold(maskImage, maskMThresh, 100, 255, cv::THRESH_BINARY);

// Dilate the mask since thresholding has narrowed it slightly
cv::Mat dilatedMask;
cv::Mat dKernel(7, 7, CV_8U);
cv::dilate(maskMThresh, dilatedMask, dKernel);

// Apply inpaint effect
cv::inpaint(originalImage, dilatedMask, result, 3.0, cv::INPAINT_TELEA);
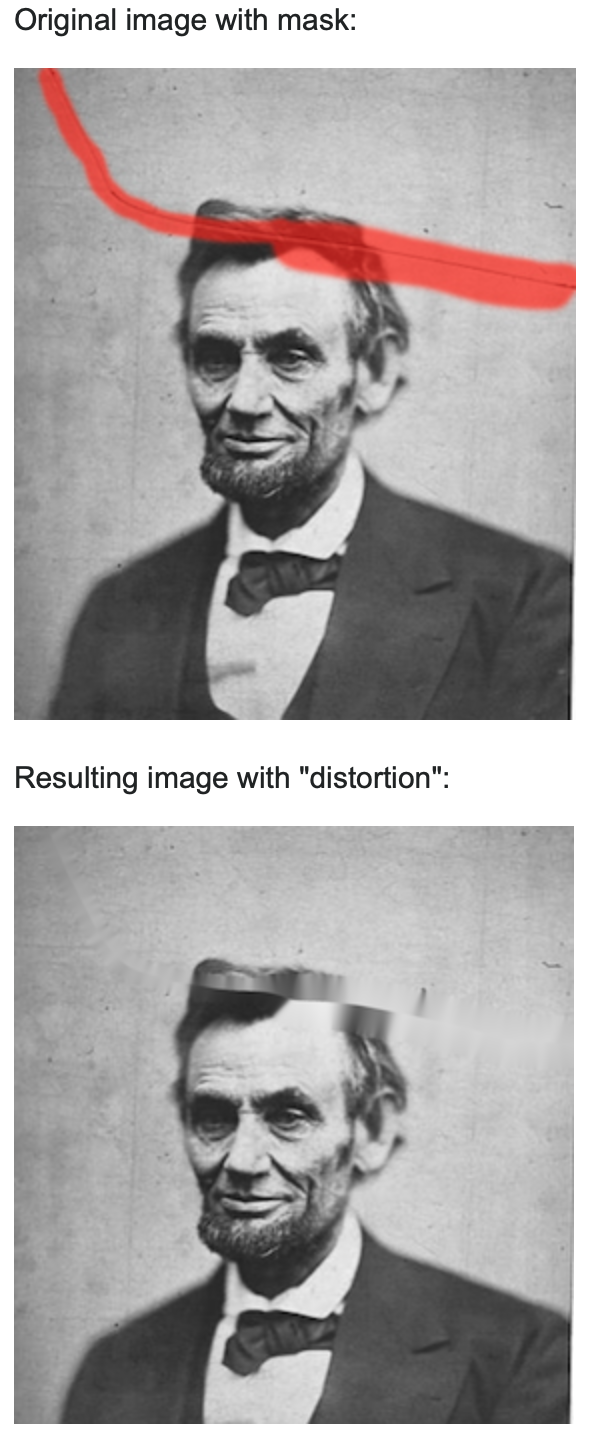
Below is a photo of the image that I am trying to restore. The mask region is colored red:
Could you add a visual of your mask. It has to be a clear 1 or 0 area as seen in the example here: https://github.com/opencv/opencv/blob.... Add an example before and after dilation, my guess is your dilation kernel is so rough that it smooths things out, which you want to avoid at all costs.
Also, keep in mind that those inpaint methods are very naive. Nowadays methods have evolved and are quite robust, for example: https://github.com/Mugichoko445/Fast-... / https://github.com/Mugichoko445/PixMi... / https://github.com/search?q=inpaint+cnn
Below is a full size mask image that I use with the inpaint function:
Please note that I did not have the mask used for the previous images shared, so this is a new mask image... The resulting image after performing inpaint was similar to the one previously shared. I believe the mask used looks correct?
I will investigate the links you shared with more evolved inpaint methods. Thanks for sharing these.
The mask indeed seems correct. It could be that the region is to big for the technique to work efficiently. Since it is only a crack, do you really want such a big mask? How about integrating some alpha matting? Like gradually mixing both images after applying the inpaint?
Steven, Thanks for reviewing the mask and confirming that it is correct. What do you mean by mixing both images after applying the inpaint? Do you mean to apply inpaint using complete mask, and then alpha blending the resulting image with original? Or do you mean to perform inpaint in iterations (each iteration uses different area of the mask) and then using the last inpaint result as the input to the next inpaint call?
Well with mixing I mean alpha blending. Your border is so huge it has to inpaint pixels from far away. Also the borders seems harsh. The center of your mask should be copied by gradually blended with the original image near the mask borders to get a clear result.