Ask Your Question
0

What's the issue with Perspective Transformation?

asked 2017-11-05 22:24:59 -0600

ghltshubh gravatar image

updated 2017-11-05 22:53:26 -0600

I am trying perspective transformation example from the documentation but I am getting different result than the example.

import cv2
import matplotlib.pyplot as plt
import numpy as np
img = cv2.imread('sudoku.png')
rows,cols,ch = img.shape
pts1 = np.float32([[56,65],[368,52],[28,387],[389,390]])
pts2 = np.float32([[0,0],[300,0],[0,300],[300,300]])
M = cv2.getPerspectiveTransform(pts1,pts2)
dst = cv2.warpPerspective(img,M,(300,300))
plt.subplot(121),plt.imshow(img),plt.title('Input')
plt.subplot(122),plt.imshow(dst),plt.title('Output')
plt.show()

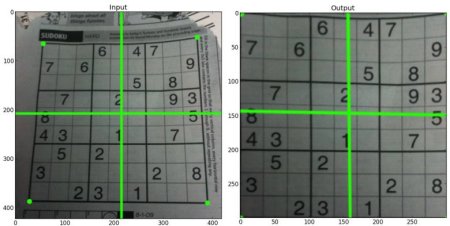
The result according to the example should look like this(ignore the green lines): image description

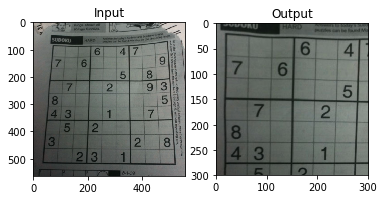
whereas what I got looks like this:

image description

Any ideas what's going on here? I am on macOS 10.13, openCV 3.3.1 and using python 3.6

edit retag flag offensive close merge delete

1 answer

Sort by ยป oldest newest most voted
0

answered 2017-11-05 23:22:57 -0600

Tetragramm gravatar image

Try plotting the pts1 on the original image. You'll notice they don't actually line up with the green dots in the sample image, and in fact, line up with the output corners in your image.

Why are they different? I dunno, maybe someone changed the image but not the example.

edit flag offensive delete link more

Comments

I don't get it what you said. The pts1 do fit on the image where the green dots are.

ghltshubh gravatar imageghltshubh ( 2017-11-06 00:24:03 -0600 )edit

Clearly they do not, take (389,390) for example. Your input image is larger than the example input image.

Der Luftmensch gravatar imageDer Luftmensch ( 2017-11-06 06:42:54 -0600 )edit

Loading the sudoku.png that comes in the opencv Source\samples\data folder, the points in your list do not match up with the green dots, but do match up with the corners of your Output image.

Tetragramm gravatar imageTetragramm ( 2017-11-06 18:10:34 -0600 )edit

Try to reduce values between 300 to 250 dst = cv2.warpPerspective(img,M,(250,250)) on your mac. I don't used mac. I used raspberry pi 3.

supra56 gravatar imagesupra56 ( 2017-11-07 07:19:57 -0600 )edit

supra That just shrinks the resulting output image and cuts off more of the image.

Tetragramm gravatar imageTetragramm ( 2017-11-07 17:51:41 -0600 )edit

@Tetragramm. He is using mac OS. What if the value can go from 300 to 500? I'm uncertainly about that.

supra56 gravatar imagesupra56 ( 2017-11-07 19:30:10 -0600 )edit

The value in warpPerspective is the size of the output image and is completely irrelevant to the OS. For this demo, it should simply match the size of the square in pts2, which is 300. If you change one, you need to change both, and the resulting output would also change.

The values in pts1 are points on the input image, and completely irrelevant to the OS.

Tetragramm gravatar imageTetragramm ( 2017-11-07 20:44:22 -0600 )edit

The pts1 was different for the actual image than the one given in the example. I checked the points manually in GIMP and corrected them to pts1 = np.float32([[72,84],[491,61],[33,520],[520,520]]) and it worked.

ghltshubh gravatar imageghltshubh ( 2017-11-11 23:53:46 -0600 )edit

Question Tools

1 follower

Stats

Asked: 2017-11-05 22:24:59 -0600

Seen: 863 times

Last updated: Nov 05 '17