This forum is disabled, please visit https://forum.opencv.org
 | 1 | initial version |
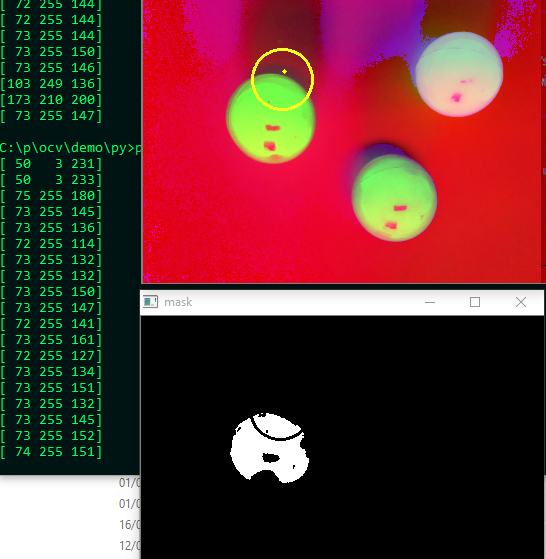
there is no problem at all, HSV, LAB or YUV images just "look weird" ;) (this is the expected result !)
what you're seing there is: H in the blue channel, S in the green channel, V in the red one (the HSV channels are linearly mapped to a BGR one for visualization)
 | 2 | No.2 Revision |
there is no problem at all, HSV, LAB or YUV images just "look weird" ;) (this is the expected result !)
what you're seing there is: H in the blue channel, S in the green channel, V in the red one (the HSV channels are linearly mapped to a BGR one for visualization) visualization)
 | 3 | No.3 Revision |
there is no problem at all, HSV, LAB or YUV images just "look weird" ;) (this is the expected result !)
what you're seing there is: H in the blue channel, S in the green channel, V in the red one (the HSV channels are linearly mapped to a BGR one for visualization)
[edit:]
maybe it gets easier, if you can just "click" your object, to determine the center color for your range ?
have a look at the python gui tutorials
import cv2
import numpy as np

image_hsv = None   # global ;(
pixel = (20,60,80) # some stupid default

# mouse callback function
def pick_color(event,x,y,flags,param):
    if event == cv2.EVENT_LBUTTONDOWN:
        pixel = image_hsv[y,x] # check pixel under mouse
        print pixel

        # you might want to adjust the ranges(+-10, etc):
        upper = (pixel[0] + 10, pixel[1] + 10, pixel[2] + 40)
        lower = (pixel[0] - 10, pixel[1] - 10, pixel[2] - 40)

        image_mask = cv2.inRange(image_hsv,lower,upper)
        cv2.imshow("mask",image_mask)

def main():
    global image_hsv, pixel # so we can use it in mouse callback

    image_src = cv2.imread('balls.png')
    if image_src is None:
        print ("the image read is None............")
        return
    cv2.imshow("bgr",image_src)

    ## NEW ##
    cv2.namedWindow('hsv')
    cv2.setMouseCallback('hsv', pick_color)

    # now click into the hsv img , and look at values:
    image_hsv = cv2.cvtColor(image_src, cv2.COLOR_BGR2HSV)
    cv2.imshow("hsv", image_hsv)

    cv2.waitKey(0)
    cv2.destroyAllWindows()

if __name__=='__main__':
    main()
