This forum is disabled, please visit https://forum.opencv.org
| 2020-09-22 02:37:37 -0600 | received badge | ● Enlightened (source) |
| 2020-09-22 02:37:37 -0600 | received badge | ● Good Answer (source) |
| 2020-09-16 16:25:13 -0600 | received badge | ● Nice Answer (source) |
| 2015-04-02 13:47:41 -0600 | received badge | ● Nice Answer (source) |
| 2014-06-30 02:08:22 -0600 | received badge | ● Student (source) |
| 2014-06-30 02:01:03 -0600 | asked a question | Retrieve non-zero elements from a SparseMat while iterating through another Suppose I have two I iterate through the This gives me the following output: Note that the 3rd element from both matrices is absent since Or do I have to stick to dense matrices for this scenario? |
| 2014-02-12 21:17:24 -0600 | asked a question | Distance types for FLANN in OpenCV-Python Are distance types such as Histogram intersection, Chi-Square supported for FLANN in the Python bindings? If yes, how should one specify them? I couldn't find any information about this in the 2.4.8/3.0 docs/tutorials. |
| 2013-12-30 18:00:20 -0600 | received badge | ● Nice Answer (source) |
| 2013-12-20 01:07:12 -0600 | commented question | How to use PCA SIFT in opencv ? PCA-SIFT isn't available out of the box in OpenCV. If you are ok with other robust keypoint-based descriptors you may refer to SURF, ORB, and Freak (http://docs.opencv.org/modules/features2d/doc/feature_detection_and_description.html). |
| 2013-12-20 01:00:38 -0600 | commented answer | adding several images In that case, you may add the |
| 2013-12-19 22:08:02 -0600 | answered a question | How to get the means OTSU threshold level in openCV? The documentation (http://docs.opencv.org/modules/imgproc/doc/miscellaneous_transformations.html?highlight=threshold#threshold) states that the function So you can simply retrieve the value with something like:
|
| 2013-12-19 21:51:36 -0600 | commented answer | adding several images You don't need to add frames before applying the medianBlur function. It works on each frame by assigning each pixel a value which is equal to the median of the values of the neighboring pixels. The number of neighboring pixels considered is based on the kernel size that you pass as a parameter. More details and example code here: http://docs.opencv.org/doc/tutorials/imgproc/gausian_median_blur_bilateral_filter/gausian_median_blur_bilateral_filter.html |
| 2013-12-19 21:37:03 -0600 | answered a question | Face threshold in various light An excellent but simple illumination normalization technique is presented in this paper, and applied to face detection: http://lear.inrialpes.fr/pubs/2007/TT07/Tan-amfg07a.pdf An existing C++ implementation of the above paper's algorithm: https://github.com/bytefish/opencv/blob/master/misc/tan_triggs.cpp Note that this is only for illumination normalization, and you may have to experiment a bit with the normalized image to obtain a binary image as per your requirement. |
| 2013-12-18 00:53:28 -0600 | answered a question | Failing Building OpenCV from source for Python2.7 My solution file misses INSTALL too, not sure behind the reason for this. But, you can easily complete the installation by going to Note that you must add the path of your OpenCV DLL files to the PATH environment variable if you are building it as a dynamic library. |
| 2013-12-17 07:10:31 -0600 | received badge | ● Teacher (source) |
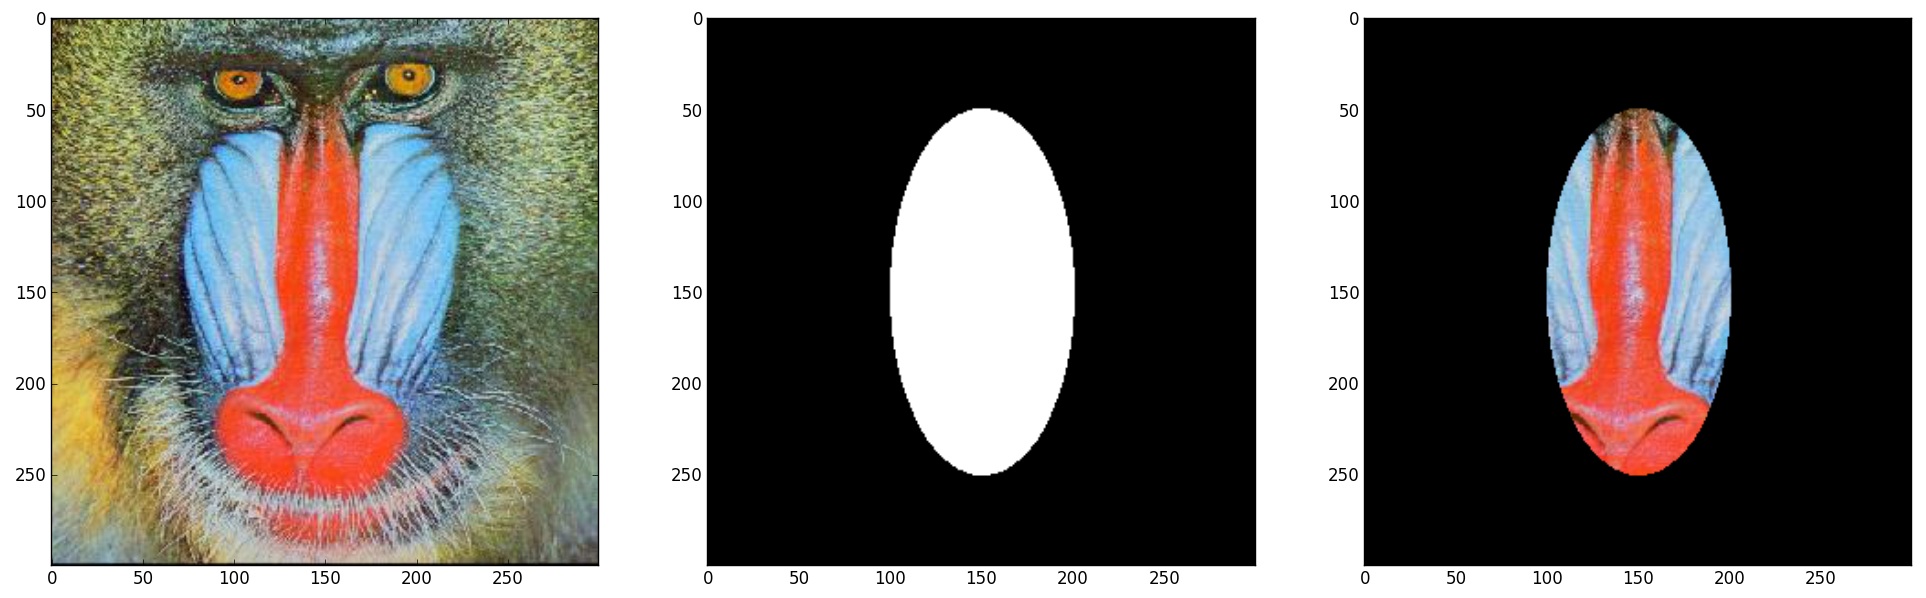
| 2013-12-16 23:34:02 -0600 | answered a question | Extract an ellipse form from an image instead of drawing it inside There isn't a straightforward way to extract the ellipse. But you may use a mask image to extract the elliptical patch with the rest of the region blacked out. First, define a mask image which has a white ellipse on a black background. Then use a bitwise and operation to extract the patch. Python code: Plot:
|
| 2013-12-16 23:08:14 -0600 | commented question | calcOpticalFlowPyrLK losing single user-defined tracking point You may try median-flow tracker. It works by tracking a grid of points (not a single point) in a defined image patch. Each grid point is tracked using Lucas-Kanade optical flow, and the median of this vector field determines location of the patch in the consecutive frame. More details and Python code here: http://jayrambhia.wordpress.com/2012/06/03/median-flow-tracker-using-simplecvopencv-gsoc-week-1-and-2/. If you still need something more advanced you may consider OpenTLD (http://gnebehay.github.io/OpenTLD/) which combines tracking, online learning and detection to robustly track objects. Infact, Median flow tracker is a part of this framework. Hope this helps! |
| 2013-12-15 19:53:39 -0600 | commented question | calcOpticalFlowPyrLK losing single user-defined tracking point Does your tracker lose track of points if they are corners detected by |
| 2013-12-14 08:48:00 -0600 | commented answer | how to select a specific bounding box @akoo regarding your previous question, since you already have the coordinates for the bounding box, you can extract the patch from the image using |
| 2013-12-14 08:44:31 -0600 | commented answer | how to select a specific bounding box @akoo you can consider accepting the answer if it helped. |
| 2013-12-10 21:24:46 -0600 | commented question | Displaying multiple windows on a screen Please provide more details such as: (1) sample code of what you have tried (2) screenshots illustrating your current results, and (3) clearly stated requirement about your expected output. For example, it is not very clear what do you mean by: "display multiple windows on a single screen". You may also refer to forum's FAQ at http://answers.opencv.org/faq/ to understand how to formulate a good question. A well formulated question will help you in obtaining meaningful answers from many people quickly. |
| 2013-12-10 21:01:27 -0600 | commented answer | how to select a specific bounding box @akoo I don't think aspect ratio is an elegant solution. You may get a lot of false positives. Assuming that the license plate primarily contains black and white colors, you can consider using the color feature first, followed by OCR to narrow down your selection. |
| 2013-12-10 02:31:20 -0600 | answered a question | how to select a specific bounding box This is not an easy problem to give a generic solution. But for the given image and bounding boxes I can think of two approaches:
This is really a very specific problem, and you need to use your domain knowledge to think of features that can help to select the required patch. |
| 2013-12-09 07:16:19 -0600 | commented question | alternate to opencv cv.waitkey in python or pygtk This really isn't related to OpenCV is it? The official docs for event handling in PyGTK are here: http://www.pygtk.org/pygtk2tutorial/s... There is an example at the end of the page. |
| 2013-11-28 02:44:40 -0600 | commented question | Creating Python bindings for missing functions @berak yes that's right. |
| 2013-11-28 00:39:55 -0600 | asked a question | Creating Python bindings for missing functions What is the correct way to create Python bindings for missing functions in OpenCV?
For example, considering an already wrapped simple function (say
Thanks! |
| 2013-09-25 05:58:36 -0600 | commented question | Building opencv-master for Python @Abid it's strange that I couldn't find "INSTALL" in my OpenCv.sln |
| 2013-09-25 05:55:59 -0600 | commented question | Building opencv-master for Python @Abid Thanks, but I already referred to the link. I was able to build, but it was dynamically linked, and I didn't add the DLL path to the PATH env variable. I fixed the problem from @berak's answer. BTW, is this the official OpenCV-Python site for the next release? |
| 2013-09-25 05:52:02 -0600 | received badge | ● Critic (source) |
| 2013-09-24 22:59:37 -0600 | commented answer | Building opencv-master for Python Thanks for the extra tip on building a shared library. |
| 2013-09-24 22:58:50 -0600 | received badge | ● Scholar (source) |
| 2013-09-24 05:30:53 -0600 | received badge | ● Organizer (source) |
| 2013-09-24 04:40:37 -0600 | received badge | ● Editor (source) |
| 2013-09-24 04:39:37 -0600 | asked a question | Building opencv-master for Python I want to build the latest version of OpenCV (dev 3.0.0) from source. I followed the instructions in official tutorial and was able to successfully complete the build. But importing cv2.pyd in Python (after copying to \Python27\Lib\site-packages) throws an error "ImportError: DLL load failed: The specified module could not be found." I found 5 files named cv2.* after the build:
What are these files (especially the pyd files) and why aren't they usable like in 2.4.6 prebuilt version which can just be plugged into the \Python27\Lib\site-packages folder directly? Thanks! |